


This week’s news from About Chromebooks, April 24, 2022
Hello, fellow Chromies!
Whether you celebrated Easter, Passover or Ramadan last week, or Orthodox Easter this week, I hope you enjoyed your holiday. I did, partly by taking last week off and also by getting out for several rides in the nice Spring weather.

Since there are two week’s worth of stories and I didn’t want to make this newsletter a novel, I’m sharing the top recent posts.
You’ll note that I placed an emphasis on topics for new Chromebook owners and Chrome OS users. But I think there are tips here that everyone will find valuable.
I also shared thoughts on actual pricing information for what was going to be next Chromebook. But as you’ll see, that would mean spending two to three thousand dollars for a Chromebook. And that’s not happening, at least not for me.
Cheers,
kct
This week’s most-read post on About Chromebooks
5 great Google Chrome Web Store extensions for your Chromebook
Much of my Chromebook usage is with Linux, which I realize isn’t really a mainstream use case for Chrome OS. And it doesn’t likely apply to newer Chromebook owners. So I spent some time digging through some of the apps and extensions I use from the Chrome Web Store for that audience. Here’s a list of what I think are 5 great Chrome Web Store extensions for your Chromebook.
Note that I only chose Chrome Web Store extensions that explicitly state they don’t sell your data to third parties. However, that doesn’t mean that your personal data isn’t being captured. For most extensions to work, they do need access to your browsing data, some account information, or other data. You should always review the privacy practices and permissions for any Chrome Web Store extension before installing it.
1. Todoist
I’ve tried nearly every major task list management app out there, if not all of them, over the past decade. And time after time, I come back to Todoist, which is cross-platform and has mobile app support as well. I use the free, basic plan, which is more than enough for most people. And the Todoist extension makes task management on a Chromebook super effective.

You get a catch-all Inbox for tasks with Todoist but you can also create your own task buckets. Tasks can also have a due date, priority, and label with the free version. If you want task reminders though, that’s part of the paid plan. Any tasks lists can also appear in a widget on your mobile phone as well.
2. Library Extension
This one is only useful if your local library is supported, so you’ll want to check for that before installing. There are over 5,000 libraries that work with this Chrome extension though, so there’s a good chance you’ll have a nearby option. The Library Extension lets you search for books, music, and audiobooks, letting you know if your local library has a copy of what you’re looking for. And it does this by integrating with websites you’re already likely searching this content for, such as Amazon, GoodReads, and Barnes & Noble to name a few.
Here’s an Amazon search I did for a Jack Reacher novel and sure enough, I can see that the book is available to borrow from my own local library.

3. Checker Plus for Gmail
Although I no longer use Gmail, I’m sure most Chromebook users do. That’s why I dug up a fantastic extension I used to have on all of my Chrome OS devices called Checker Plus for Gmail. Aside from showing how many unread Gmail messages you have, with one click on the extension icon, you have a mini Gmail experience.

Above you can see that my still active Gmail account has a few recent story pitches. (Yeah, that’s mostly what goes to my old Gmail address these days.)
I can see them all and I can interact with them by clicking any email. I can respond, delete, mark as read, whatever. So there’s no need to keep a Gmail browser tab open all the time, which can be distracting. There are actually a ton of additional features such as color customizations, scheduled do not disturb times, and more.
4. StayFocused / Freedom / Limit
I previously covered StayFocused, which is a Chrome extension that blocks access to certain websites that you specify. The idea here is to boost productivity by restricting any sites that can get you off track. And I can vouch for the results as this extension has kept me focused when I needed to be. The newest iteration of the extension is called Freedom and it still delivers on the old promise. But Freedom is a paid service, costing $2.50 a month. So I’m also highlighting a lighter version called Limit.

Limit does what it suggests: It limits how much time you can spend per day on a website or app. So it’s not as rigid or as customizable as Freedom. Still, it has its benefits if you want to spend more time doing useful things on the web.
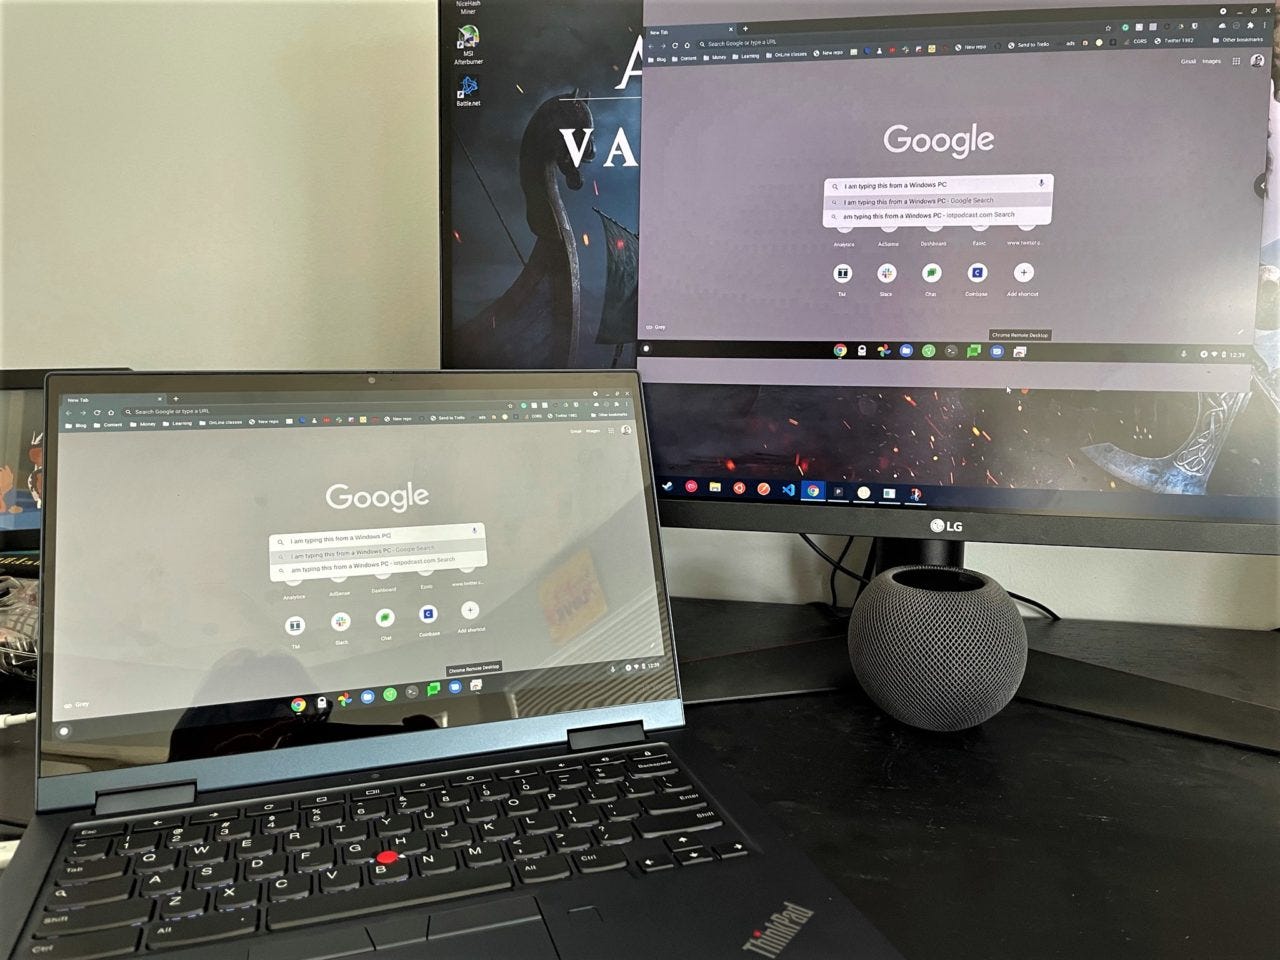
5. Chrome Remote Desktop
Longtime Chrome OS users will surely know about this extension. If you’re relatively new to Chrome OS, however, you might not be familiar with Chrome Remote Desktop. It’s ideal for remotely connecting to or controlling another computer that has the Chrome browser installed.

And it works both ways: You can control a PC or Mac from a Chromebook, or you can access and control a Chromebook from a PC or Mac. I’ve found this super helpful when providing remote assistance to a friend or family member, for example. Apparently so have other people as it has more than 10 million users! Grab it right here in the Chrome Web Store.
These are just a few of the great Chrome Web Store extensions I use or have used, on my Chromebook. I’m sure there are plenty of other excellent options, so if you have recommendations, share them with the group in the comments!
You can now order an HP Elite Dragonfly Chromebook but…
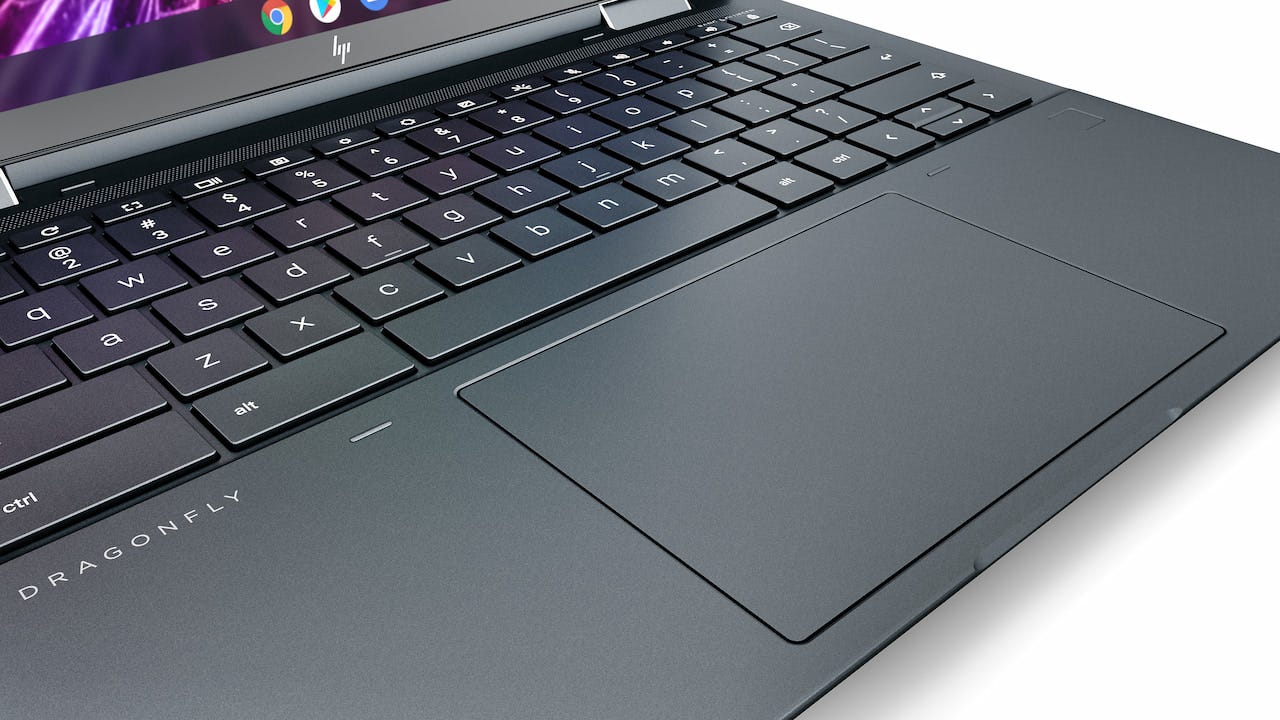
Earlier this week, I reported on the first price seen for the HP Elite Dragonfly Chromebook. I thought the $2,165 price tag represented something akin to the highest-end configuration. Boy was I wrong. Like really wrong. You can now configure and order this 13.5-inch convertible Chromebook, and when I did, I saw that the $2,165 cost was almost the lowest configuration. So you can now order an HP Elite Dragonfly Chromebook but be prepared for major sticker shock and a long wait.

Just to illustrate this situation, here’s what you get for just over two grand:
An Intel Core i3-1215U CPU with Intel UHD graphics
8 GB of memory
256 GB of NVME M.2 storage
A 1080p touch display with 400 nits of brightness
Backlit keyboard and haptic trackpad
HP digital pen
WiFi 6E and Bluetooth 5.2
Integrated fingerprint sensor
50 Whr battery and 45W power adapter
Overall, this is a really nice package. It’s not, however, even close to what a mid-spec or top-tier configuration will cost you.
Want to jump up to an Intel Core i5-1235U and get the Intel Iris Xe GPU for Steam support? That’s $153. But if you want 16 GB of memory with that Core i5, it will cost you $452 more. That’s partially because the CPU jumps up to a 1245U and includes Intel vPro support. And at that point, you’re looking at paying $2,627.
I was hesitant to see what a Core i7 upgrade costs but curiosity got the better of me.

It’s a $746 upgrade over the base model to get a Core i7-1265U processor which also includes a memory upgrade to 16 GB. That’s a $2,971 Chromebook for those without a calculator. And that’s not even the top end. You can jump to 32 GB of memory for an additional cost although I doubt many will do so.
As I noted earlier this week, this is still an “enterprise” branded Chromebook.
There are supposed to be consumer models as well with similar configurations, although they probably won’t include any vPro support. It’s not something a consumer likely needs. That and the fact that a Chrome Enterprise license isn’t needed for a consumer device should bring lower price points.

But how much lower if they’re going to have 12th-gen Intel CPUs and a minimum of 8 GB of memory? They’d have to be at least a thousand dollars lower on a relatively like-for-like basis to make any dent in the consumer market beyond Chrome OS power users.
So you can order an HP Elite Dragonfly Chromebook now but… I wouldn’t.
Even if you do, all of the delivery dates are currently out to October of this year. Those are subject to change but that’s what HP is showing right now. Let’s hope those change and we see some much lower prices for consumer models. I’m still dubious about that.
This Google Chrome tip shows you more browser bookmarks at once
How many browser bookmarks can you see at once on Google Chrome? Hands up if it’s more than 10. What about 20? And how many hands are still up if you can fit 30? I don’t have that many but if I did, my hand would still be up. That’s because I have 16 bookmarks showing in Google Chrome only taking up half of my browser width.
No, I haven’t done this with any experimental flag or setting in Google Chrome or Chrome OS. And although I do have the Chrome Side Panel enabled on my Chromebook, I’m not using that either. At least not in this scenario. I’m simply using a handy trick to minimize the space taken by each of my browser bookmarks.
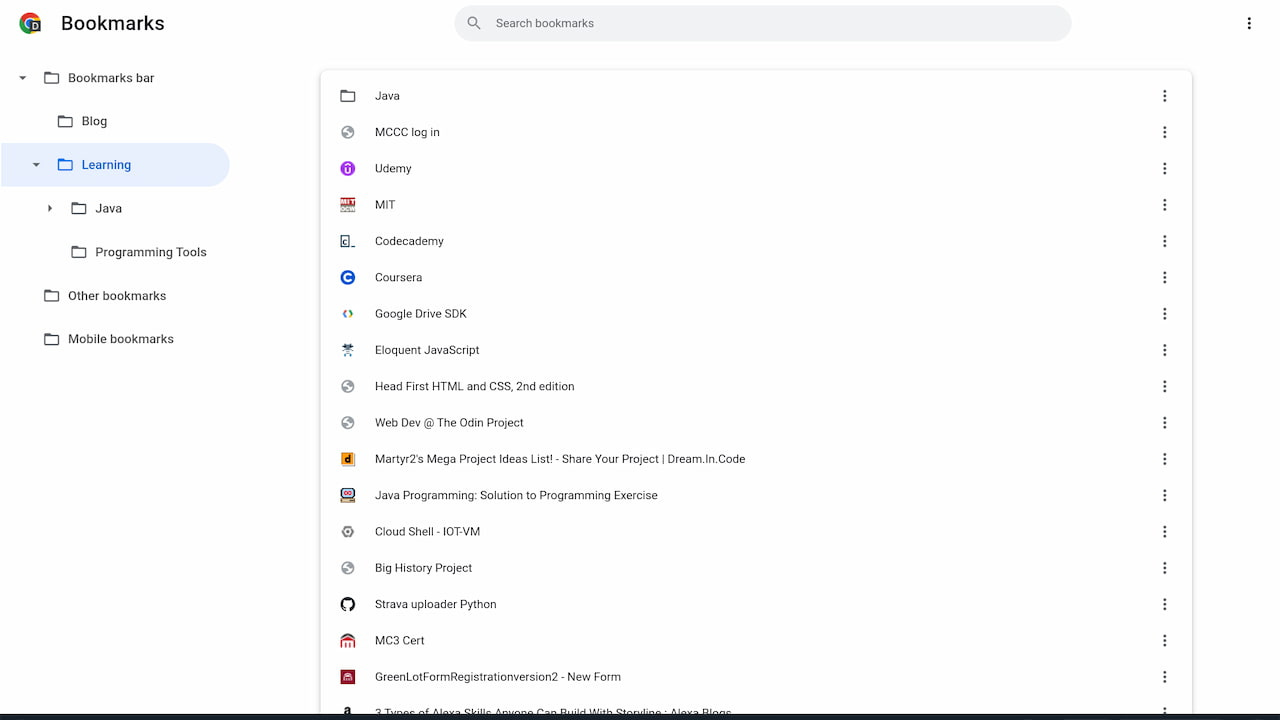
Here’s a screenshot of my current bookmarks, which will clue you in to my secret tip:

You’ll see that the first 12 bookmarks don’t have names at all.
Instead, they’re just an icon, called the favicon, that represents the bookmarked site or service. I think of them similar to the app icons on my phone, because they’re all easily recognizable to me.
I know that ProtonMail is the first icon, for example. Launch School, where I’m trying to become a JavaScript ninja is the second icon, showing Launch School’s logo. And that little minion icon that’s tenth in the list? That’s my personal site, which I set up with a minion for the favicon. No judging… I had to come up with something!
Towards the end of my bookmarks, I do have both an icon and a name for some saved sites.
I purposely made these short names because the icon either wasn’t recognizable or there simply is one. And finally, I have two folders that have a fair number of browser bookmarks. So, I have a little bit of everything here and I can easily see all of my bookmarks at once. Plus I have room for more.
So here’s how to replicate this approach, which is very simple. I’ll illustrate the process by adding a Google News bookmark to my browser.
First, navigate to the site you want to bookmark. Then click the small star icon in the browser bar, which brings up the following form to create the bookmark:

See how the Name field shows “Google News”? You can modify that to something shorter, such as “News”. And if you need to do that for a particular bookmark where the icon isn’t recognizable, do that. But if you can associate the site’s favicon with the site, just remove the name and click Done.
Here’s what it looks like after I did this with Google News:

All I’ve added to my Google Chrome bookmark bar is a small icon that represents Google News. Boom!
Obviously, it’s very likely you already have a few (or a few hundred) bookmarks. So you would only follow the above process when adding new ones.
However, you can delete or shorten the names of any existing bookmarks by right-clicking on them and choosing to edit them. Or you can delete names in the Bookmark manager tool of Google Chrome as well.
So get to it! Pick your most important bookmarks and hack away those names when you can. You’ll likely have a lot more space to add even more important ones that didn’t fit before.
New Chromebook user? Learn to use Chrome OS with this simulator
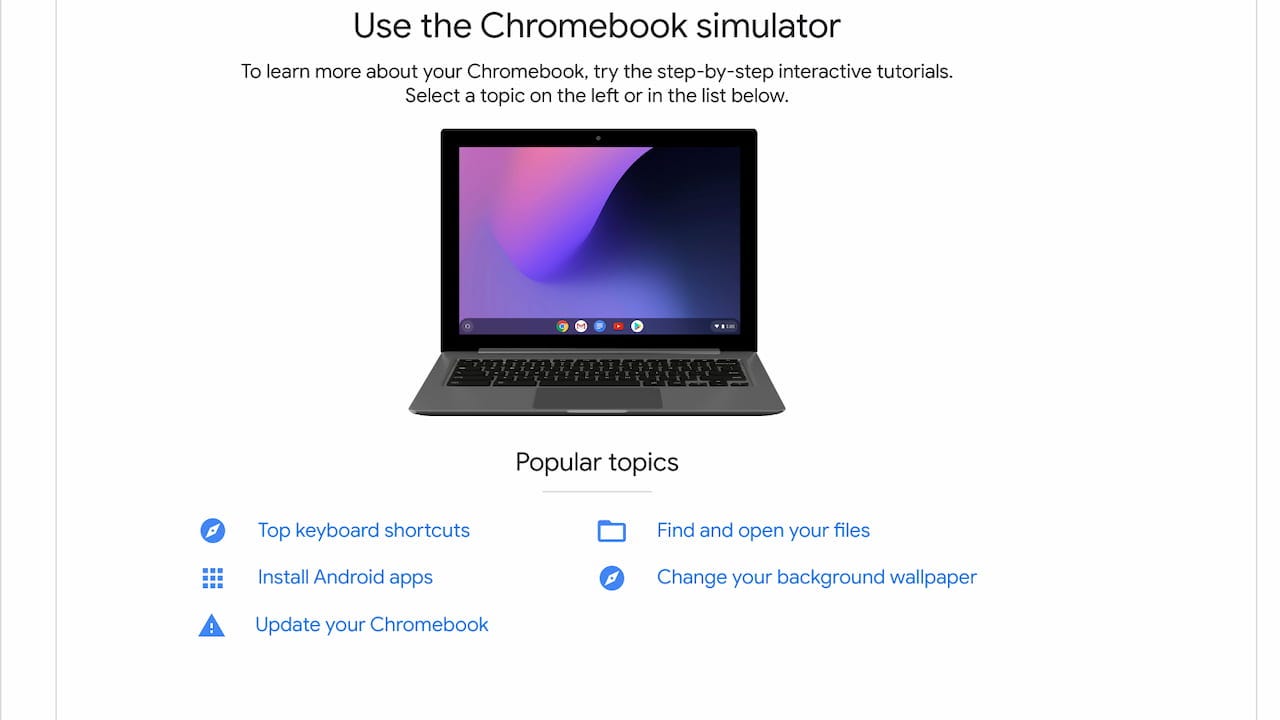
Long-time Chromebook owner? Then you probably know the basics of Chrome OS. If you’re a new Chromebook user though, Google’s desktop operating system might be a bit of a mystery at times. Thankfully, you can learn to use Chrome OS, even without a Chromebook by using this simulator.
Google has long had the Chromebook simulator available, although I don’t see it mentioned often. And it’s not going to cover every single function. Still, you can learn to use Chrome OS and pick up all of the key functionality pretty easily. All you need to do is fire up a web browser and hit this website.
The simulator provides a menu on the left, gathering up topics in specific groups. But it also shows the most popular Google Chrome OS topics front and center. So you can start wherever you want, looking through the groups, hitting the top picks, or even searching for a feature.

Whichever you decide, I highly recommend clicking the full-screen option before using the simulator to learn about a topic. That’s because there’s a virtual Chromebook that takes you step-by-step for each function in a lesson.
Each walkthrough doesn’t just tell you the steps, though.
The idea is for you to click the Chrome OS interface on the virtual Chromebook to move through each step. Think of it as a virtual teacher that makes the class actually perform each step on a Chromebook. Technically, you can skip the clicking around by tapping the “Next” button and proceed to the next part of the process for any lesson. But honestly, why would you?
The easiest way to learn any new software is to walk through it step-by-step and actually, or virtually, use it. And the simulator makes it easy by flashing the interface element you need to click:

Overall, I’d say you can learn to use Chrome OS basics in under 30 minutes with this tool. Sure, there are plenty of advanced features and topics that aren’t covered. The simulator doesn’t tackle how or why you’d want to use Linux on your Chromebook, for example.
And some of the topics need an update as Chrome OS evolves with every four-week software update. The app Launcher shown in the simulator isn’t the latest version, for example. Then again, the vastly improved Chrome OS Productivity Launcher just arrived in Chrome OS 100 a few weeks ago, so I’d expect to see the simulator updated accordingly in the near future.

Either way, just covering the basics of Chrome OS in this simple, approachable method can be very useful. And since it runs on the web, you can learn to use Chrome OS even if you don’t have a Chromebook.

That’s all for this week!
Again, I hope your holidays were relaxing and gave you all more time to spend with your loved ones. I find that disconnecting from the web over a holiday or a weekend recharges my brain. I guess that means I have to double my output this week on Chrome OS news!
Until next time, keep on Chromebookin’!
I'm just reading this now - hence the late comment/question.
I liked the idea of the Library extension you talked about. I went to the website and found that my Library is supported. This was very easy to do, even if I did have to scroll a little to find that option.
I went to download the app and got the warning that the app could change everything on my chromebook.
I decided not to download this.
If I am just looking up information - why does it even want to change my chromebook?
And of course I don't want any app or extension with that broad of an access on my chromebook.