


This week's news from About Chromebooks, April 30, 2023
Hey Chromies!
As we prepare to start the month of May, I hope you’re all doing well! Time is flying from my perspective. Then again, I’m probably older than a good proportion of you. 🤣
This week I uncovered a ChromeOS change that I was really excited about. Unfortunately, my excitement was short-lived as a Google developer clarified the change. I thought ChromeOS would show different icon styles for Android and web apps with the change. I think that’s needed. Google, however, wants all Chromebook apps to have the same icon style. While I disagree, and updated my post to reflect the actual change, I’m sharing it this week. I’d love to hear your thoughts.
There is one big new feature in ChromeOS this week that is a step forward though. It’s the Google Photos video editing for Chromebooks. It’s a bit limited as I’ll show you in my “how-to” post. Google Authenticator also got an upgrade, which I explain below even if it’s not too helpful for all Chromebook users. And if you don’t have a privacy shutter on your Chromebook camera, you’ll appreciate Google’s new privacy controls in ChromeOS.
Lastly, my regular, weekly thanks goes out to subscribers that bought me a coffee. If you get value from this newsletter and want to say thanks, click the button below. As always, that’s never required but sincerely appreciated!
Cheers,
kct
This week’s most read post on About Chromebooks
Finally: ChromeOS web app icons will look different on Chromebooks
Update: The developer assigned to this effort kindly shared more information about it. There isn’t a change of icons in the works, after all. This is to fix a bug so that all icons appear the same. He says: “The intended design for ChromeOS is that icons for all app platforms will be indistinguishable, which I know isn’t what the author was hoping for. It is intended to reflect that users should not need to know or care what platform an app was written on, they should just be “apps”.” The original post continues below.
A new developer effort to help differentiate between web and other apps on ChromeOS is in the works. The feature request was added to Google’s queue on March 30 but coding hasn’t started yet. However, today the request was assigned to a developer. The change as it’s now proposed will use squircles for ChromeOS web app icons. I don’t think that’s the way to go.

Users are unsure of what platform their ChromeOS apps are from
Overall, this is very good news for the ChromeOS-iverse. It will address one of the most often complaints I’ve heard from people over the past six or seven years. That complaint is not being able to tell if an app installed on a Chromebook is native, web-based, or Android.
I personally don’t have this complaint because I gravitate towards web apps over the Android version in the Google Play Store. So I don’t have two YouTube apps, like some people do, for example. I have one version of it and I know it’s the web app because I installed it as a PWA, or Progressive Web App. Clearly it’s a ChromeOS web app and there’s no duplication or confusion to me in this case.
But I understand the issue that people have.
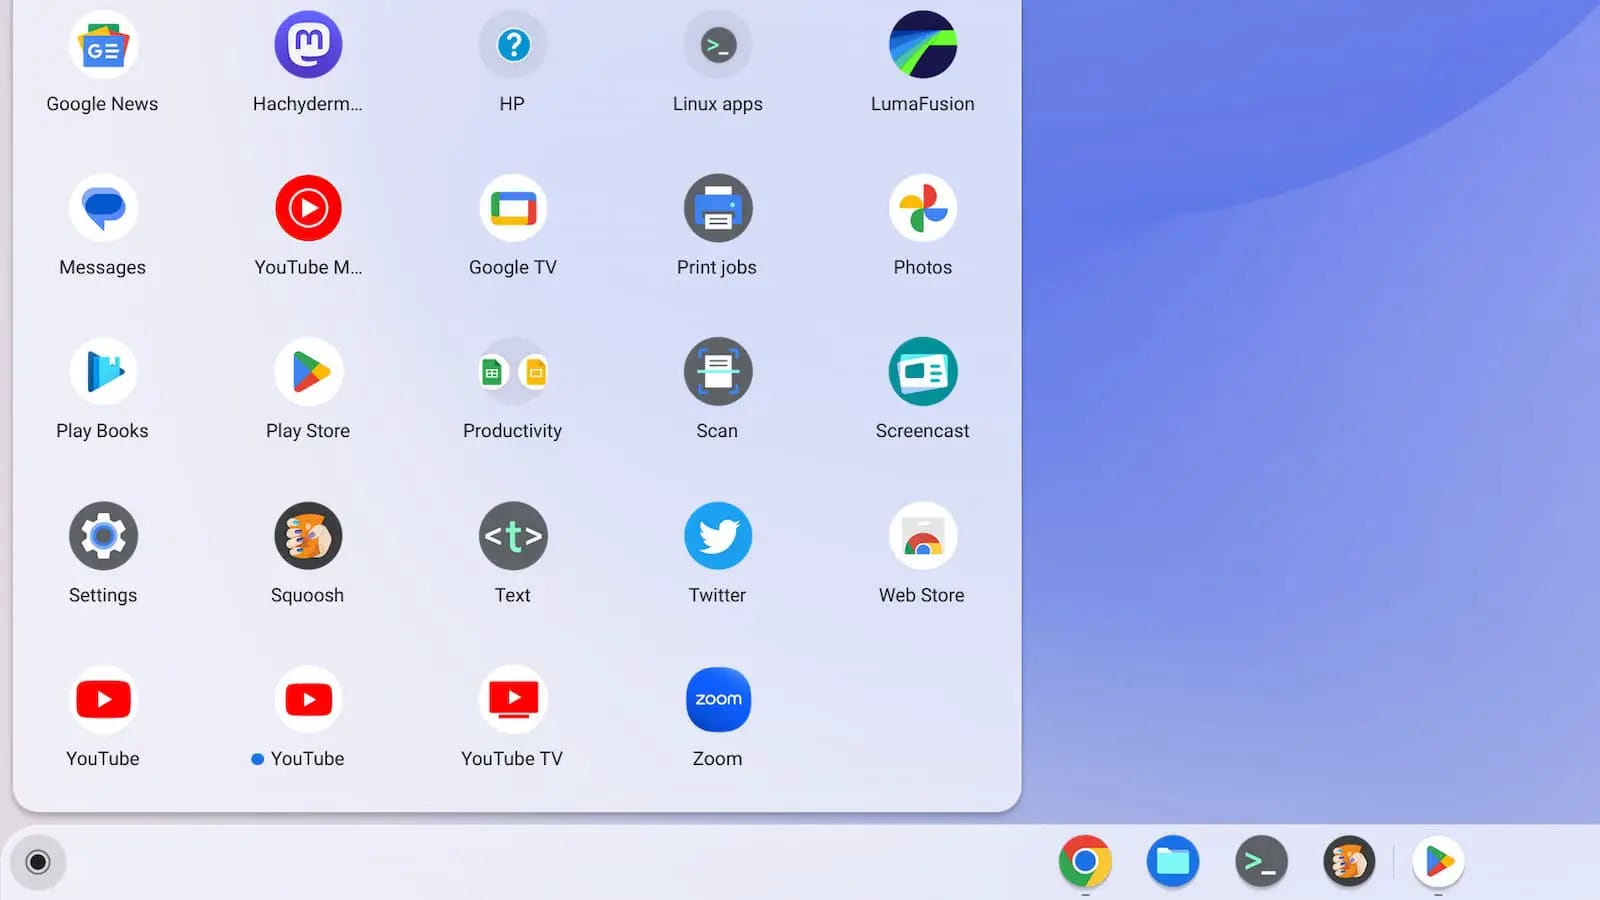
Here I installed the YouTube Android app on my Chromebook and yes, it is confusing to have two versions in my Launcher:

Addressing this confusion with icons to differentiate web apps is helpful.
However…
This ChromeOS web app icons solution feels backwards to me
While I fully support using different icons for web apps, I don’t think Google should use the squared circle, or “squircle” approach here. And I have a logical reason for my stance.
Back in 2019, Google changed the Android icons in the Google Play Store. It then became mandatory to have Play Store app icons use rounded corners, i.e., squircles. And by “mandatory” I mean that Google would automatically convert the old circular icons to squircles. Developers could upload new Android app icons to fulfill the requirement but Google made the changes if that didn’t happen.
That design language is still in place today.
Hit up the Google Play Store in ChromeOS and you’ll see app icons in squares with rounded circles.

Here’s the thing. If Android app icons universally use squircles, why use the same design for ChromeOS web apps?
That solution is completely backwards and inconsistent between Android and ChromeOS. Instead, I’d think ChromeOS web app icons should be full circles, like they are today in the Launcher. It’s really Android apps on Chromebooks that should have the squircles, no? That would bring cohesiveness between Android on phones and tablets and Android on Chromebooks.
Hopefully, Google considers this before making the change to ChromeOS web app icons. I’ve starred the issue and will watch for progress. If it looks like Google is going with squircles for web apps, I’ll leave a comment suggesting Google rethinks the approach. Let’s not make one thing less confusing by making it more confusing!
Sync comes to Google Authenticator but Chromebooks left out

If you’re serious about protecting your online accounts, you’re surely using some type of authentication app. Please don’t tell me you’re using SMS for that! I use Google Authenticator in a limited fashion because it’s a little more limited than my preferred choice, Authy. Today sync comes to Google Authenticator, bringing it to closer to other options. Sadly, Chromebooks are still second-class citizens when it comes to Google’s authentication solution.
The good news for Google Authenticator
Google’s Security Blog introduced the new synchronization feature today. Until today, one time passwords stored in Google Authenticator were stored locally on the same device as the app. Lose or break your device and those one time passwords were gone. And that’s a problem if you don’t have Google Authenticator on other accessible devices.

The new change now synchronizes the one-time passwords across all of your devices with Google Authenticator installed. Of course, it uses Google Sync, a staple for Chromebook users. More on that on in a minute.
Google says the new sync feature in Google Authenticator is “making one time codes more durable by storing them safely in users’ Google Account. This change means users are better protected from lockout and that services can rely on users retaining access, increasing both convenience and security.”
The Google Authenticator sync function is optional, so if you don’t want your codes in the cloud, you don’t have to use that feature. However, I already upgraded my Authenticator app and enabled sync. Why? Because without it, it’s a huge pain to set up Google Authenticator on a new device.
Every two-factor account has to be manually set up unless you use the Export feature from one device to another. Now all of my authentication codes appear on all of my supported devices. Simply installing the app on a new device and signing in will show all of the two-factor accounts and codes.
Sorry Chromebook users, no Google Authenticator for you
I just mentioned “supported devices” above and unfortunately, Chromebooks generally aren’t included in that list. I do recall installing the Android version of Google Authenticator on my Pixel Slate. That was the last Chromebook I used where I could install the app though.

I thought perhaps the Android app worked on the Slate because of the device’s fingerprint sensor. I just tried to install it on the HP Dragonfly Pro Chromebook, which also have a fingerprint sensor but it was a no go. So that’s not the barrier here. I suspect Google-branded devices, or at least those with a fingerprint sensor (read: The Pixel Slate), is the current requirement.
This brings me back to my mini rant about Chromebook fingerprint sensors. I said that they need to do more than just have the ability to unlock your laptop. This is a perfect use case and example of where a finerprint sensor could add value as a two-factor authentication solution.
In fact, I find it mind-blowing that Google Authenticator, now with Google Sync support, can’t effectively be used on Chromebooks. I can, and do, use it on my iPhone and iPad. But my Chromebooks? Can’t do it. And that’s a damn shame. Frankly, it should be part of the “Better Together” strategy at the very least; that’s the ChromeOS Phone Hub feature that ties your Android phone and Chromebook together.
Maybe the in-progress, upcoming app streaming experience in Phone Hub will let you use Google Authenticator with a Chromebook. That of course, will only work with Android phones, so it won’t help me, of course. Either way, Google Authenticator is still a second-class citizen, at best, when it comes to ChromeOS. And it shouldn’t be.
The long-term solution may be Passkeys which will work on Chromebooks
Before I toss my Chromebook against the wall in frustration, there may be hope on the horizon. No, it won’t involve Google Authenticator but then again, it won’t need to. I’m talking about the Passkeys initiative announced last year.
Instead of passwords, Passkeys are like approved authentication tokens. Like passwords, you’ll have to set up a Passkey for each app or service you use. But there’s no “choosing” a combination of alphanumeric and special characters. No password length requirement. And no need to remember a password. So there’s no need to type any passwords, either.

Instead of one-time passwords from an authenticator app, Passkeys check to see if you have the private keys created during the Passkeys configuration on each account. So they combine a password and second factor all in one, without sending authentication codes.
If that’s the master plan on bringing more secure account credentials to Chromebooks, then I’ll just have to wait for the implementation. Until, then I’ll use my Chromebook and my… iPhone.
New ChromeOS privacy controls coming to Chromebooks

On its Chrome Enterprise blog, Google announced some excellent new ChromeOS privacy controls coming to Chromebooks. These specifically relate to the device microphone and webcam. Essentially, you’ll have one place to manage access to your Chromebook’s mic and camera. I see this as a nice upgrade for Chromebooks that don’t have physical “kill switches” for audio and video inputs. The feature stems from work first reported in September.

A single place for ChromeOS privacy controls
The goal here seems to be two-fold.
First, to enhance system-level permissions in ChromeOS for microphone and webcam access. Second, to offer a single place for these ChromeOS privacy controls. And that single place is in the ChromeOS settings, per Google’s announcement:
Later this year, users will be able to manage their camera and microphone settings across the operating system from one place in Settings. This way it only takes one click for users to completely turn off their camera or microphone all from one place when they need extra confidence in staying on mute.
While Google says the new ChromeOS privacy controls will arrive “later this year”, I’m told they’re already in the ChromeOS 113 Beta Channel if you want to take them for a spin.
I don’t currently have any devices on the Beta Channel, so I don’t know if there’s a flag for this feature. If you don’t see the new controls in Settings, browse over to chrome://flags. I suspect a search for “microphone” will surface the experimental flag if there is one.
How the new ChromeOS privacy controls work with a mic and camera
Although I can’t use the feature yet, I did receive an animated GIF of how the controls work, using the example of a Google Meet call.

You can see that this more like a system-wide kill switch for the mic and camera. It’s akin to the physical privacy shutters that disable camera, microphone, or both on newer Chromebooks. So it’s a software approach to provide the security of hardware solution.

Personally, I’d rather have a physical switch for privacy. The best ones don’t rely on software all but instead cut the power or connection to a Chromebook mic and camera.
Software can be hacked, of course. Still, it should provide an additional level of privacy on older Chromebooks. And it’s not like Google can change the hardware of old ChromeOS laptops.
Individual site permissions aren’t going away
Note that I said earlier this feature enhances system-level permissions in ChromeOS for microphone and webcam access. I don’t want you to think that the existing microphone and camera permissions process is going away. It isn’t. You’ll still have to grant access for an app or website to use your Chromebook audio and video inputs.

The enhancement part is a single place to disable those inputs at any time. You’ll see indicators when the mic and webcam are in use as you always did but you can quickly kill them as needed.
How to use the Google Photos video editor on a Chromebook
Although it was teased last year, the new Google Photos video editor is now available for Chromebooks. While it definitely has more features than the older, bare bones version, it’s still limited. However, as a basic Chromebook video editor, it is a step forward. Here’s how to use the new Google Photos video editor on a Chromebook.
Make sure you have the latest Google Photos app
Right off the bat, I didn’t see the new video editor on my Chromebook. Since Google is using the Photos app for Android, I figured I’d check for updates. Sure enough, one was available. So you’ll definitely want to make sure you have the latest Google Photos app from the Play Store installed on your Chromebook.
Interestingly, I didn’t see any mention of the new Chromebook video editor in the app’s release notes. Then again, most people using Google Photos are using it on an Android device. This additional feature isn’t relevant to most of those folks. Still, it would be helpful for Chromebook users to see the feature addition in the app description.
Hop into the Utilities section of Google Photos on your Chromebook
This is another bit of a head-scratcher to me: Finding the Chromebook video editor isn’t quite intuitive. It’s buried in the “Utilities” option of Google Photos. You’ll see that option in the left menu of Google Photos. Click it and look for the “Create” section and then choose the “Movie” option.
If you have the newest Google Photos version installed, you should see this updated creation menu:

For my testing, I didn’t want to use a theme. Clicking the “New Movie” button starts with a clean slate.
Import clips to the Google Photos video editor
After selecting a theme or choosing to create a new movie, you have to import clips and/or photos to the editor. These all come from Google Photos and I do like that you can search for content.
In my case, I searched for “videos” and selected a few clips that I had previously saved to Google Photos.

Once you’re done selecting the content for your video, Google Photos will download that content into the video editor. After all of the content is downloaded to your Chromebook, you can begin the editing process.
Limited video editing features
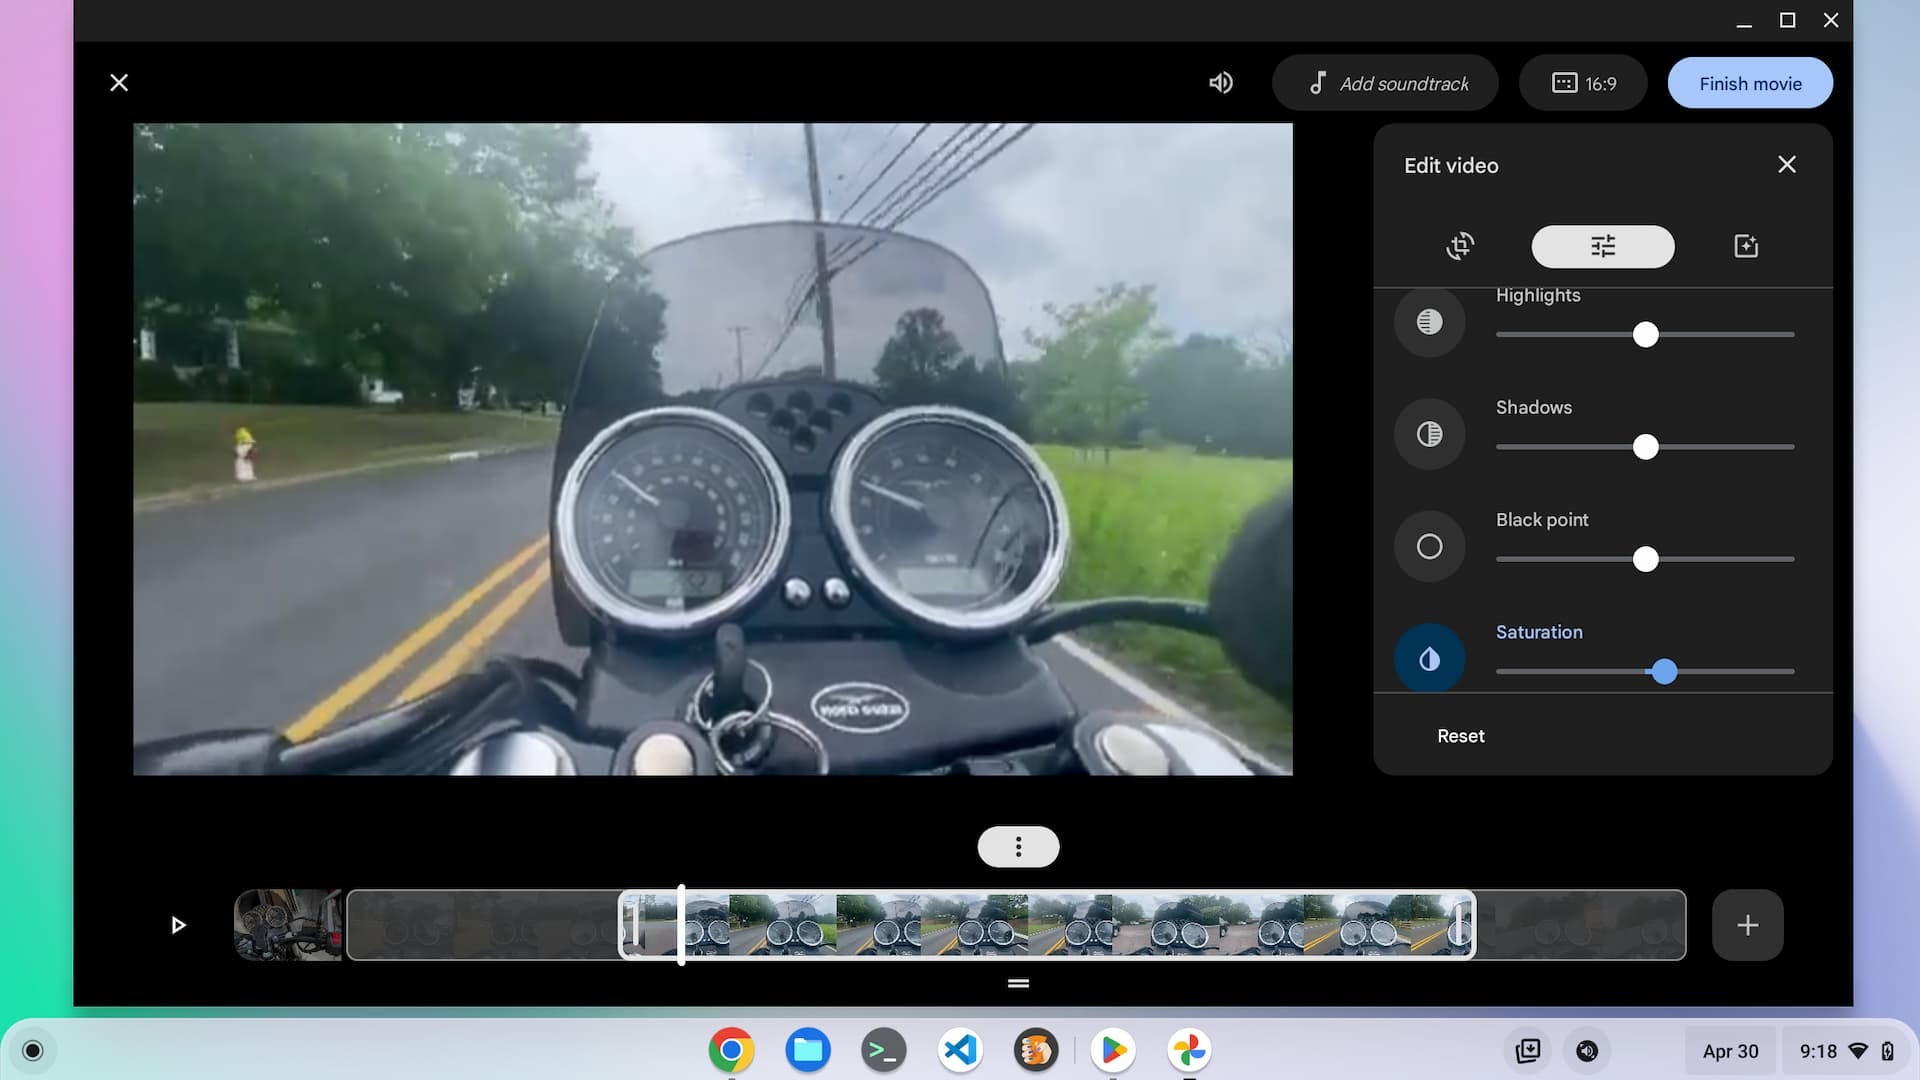
On the right side of the video editor are three main functions. You can change the aspect ratio of some, or all, of your video, for example.

Above, I’m in the aspect ratio section, although I didn’t want to change anything. I have trimmed the beginning and the end of the second clip in my video, shown on the bottom timeline. The “+” button on the right side of the timeline lets you add more clips. And you can click the two lines under any clip to drag it to another spot in your timeline.
The second feature menu after aspect ratio is for image enhancements. Think of these like the controls for your photo edits. You can adjust highlights, saturation, shadows, etc… for any clip. For my video, I boosted the color saturation a smidge.

The third menu option is for applying filters to your videos. Again, these are similar to the photo editing filters. I played with these but didn’t want to use any for my test video.

If you want to add a soundtrack to your movie, there’s a button above the editing menu for that. Google Photos includes plenty of options here, grouped by type of music. I added one for testing, which worked, but opted to remove it for my video. I wanted to hear the motorcycle sounds from my short ride after doing some work on the bike.
Export the movie from the Google Photos video editor
Once you’ve edited your clips into a cohesive movie, just click the “Finish Movie” button at the top right. Google Photos will crunch it all together and tell you that it’s processing your video. The processing time will depend on your edits and how long your movie is, of course. For the short video I put together in testing, that was about a minute or so.

When it’s done, you’ll be notified the movie is complete and you’ll see it in Google Photos. Your edited movie isn’t stored locally on your Chromebook but you can certainly download it from Google Photos if you want. Look for your movie by clicking the “Creations” button in the main Google Photos menu.
I used the “share” feature to upload my video to YouTube but there are plenty of other options for sharing or downloading.
Enjoy the video edited on your Chromebook!
When all is said and done, how do movies turn out? Not bad based on my test.
Here’s the video I created using this process. Note that you won’t see any transitions between clips; I don’t see a way to add any, which is another limitation.
Overall, the process of using the Chromebook video editor is relatively simple. Then again, the “app” is relatively simple as well.
Don’t expect any advanced functionality that you’d find in a full-featured video editor. LumaFusion offers much more control and many other options by comparison. Of course, that’s an Android app you have to purchase for use on your Chromebook. If you want a free video editor, well… you get what you pay for.
That’s all for this week!
Aside from making the above test video, I also shot a video about minimalism and your wallet. I’ll leave the link here in case that’s of any interest. These types of videos are rough cut, one-take shots, so don’t expect to be wowed by production quality. I’m simply trying to share some useful concepts in a real, authentic way.
Meanwhile, a new Chromebook review unit just arrived, so you can expect at least a first impressions post next week! I’m also expecting Google Chrome 113 to arrive in a few days, soon followed by ChromeOS 113. Those two releases, as well as other Chromebook news, will surely keep me busy!
Until next time,
Keep on Chromebookin!