


This week's news from About Chromebooks, August 14, 2022
Hey, fellow Chromies! While all of you are getting used to the new ChromeOS 104 software update that arrived last week, I’m digging through ChromeOS 106.
I’ve already found a few new features in the works and this week I share two of them. But the big story, at least in terms of the most read post, was my explainer on how to use traditional Function Keys on a Chromebook.
Not everyone needs to hit F8, F12, or some other function key, of course. If you do though, it’s not exactly intuitive to use a function key since Chromebooks don’t have them! This tip lets you use the top row keys in their place.
Oh and I’m using my iPhone to wirelessly transfer photos to the latest HP Chromebook. I didn’t even know I could do that, so I explain how it works.
Cheers,
kct
This week’s most read post on About Chromebooks
How to use function keys on a Chromebook
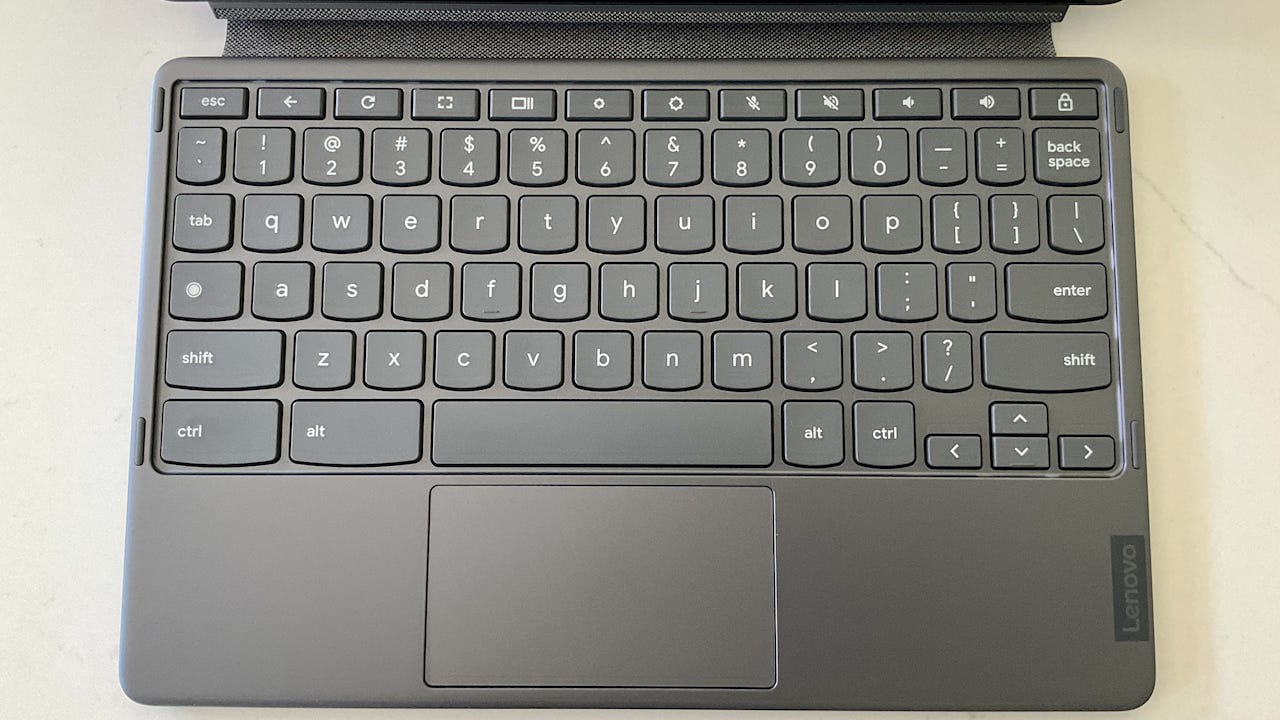
I recently ran into the situation of needing to hit the F10 key on my Chromebook. And… it doesn’t have an F10 key. Chromebook keyboards don’t have any traditional function keys, in fact. But ChromeOS does support this feature if you need it. Here’s how to use function keys on a Chromebook, since Google doesn’t explain this in any help article I’ve found.
First, here was the situation I was in. I was remotely accessing the server for this site from my Chromebook. The interface uses a standard Terminal. And the monitoring program I was using to check the CPU and memory usage on the server requires function keys, as shown below.

You can see the menu commands at the bottom of the remote Terminal. To exit, or Quit, that monitoring program, I needed to press the F10 key on my keyboard. Therein lies the problem.
Tucked away in the ChromeOS settings is a solution.
To use function keys on a Chromebook, navigate to Settings -> Device -> Keyboard and you’ll see this screen:

Look for the “Treat top-row keys as function keys” option and enable it. Once you do that, your Chromebook keyboard will turn the standard ChromeOS top row keys into function keys. You get the full range, from F1 to F12. Of course, you’ll have to count over to the right function key since the keys all have ChromeOS-specific purposes.
On the Chromebook I was using, the microphone mute key is the 10th key, so pressing that sends an F10 key press. And that stopped the monitoring app I was using.
There’s a downside to this change, of course.
If I want to actually mute the microphone on my Chromebook, I now have to press the Everything key and my new “F10” key at the same time. I know the Settings image above says “Hold the Search key”, but that’s now called the Everything key. Google hasn’t updated the text in the Settings to reflect that.
Remembering to press the Everything key when using a ChromeOS keyboard function is a small price to pay. And I’ll gladly pay it, as much of my coding efforts on a Chromebook relies on using F1 through F12.

You may not be a coder. But you might run into a similar situation where you need the good old function keys on a Chromebook.
Now you can.
ChromeOS 106 integrates Google Photos Memories on Chromebooks
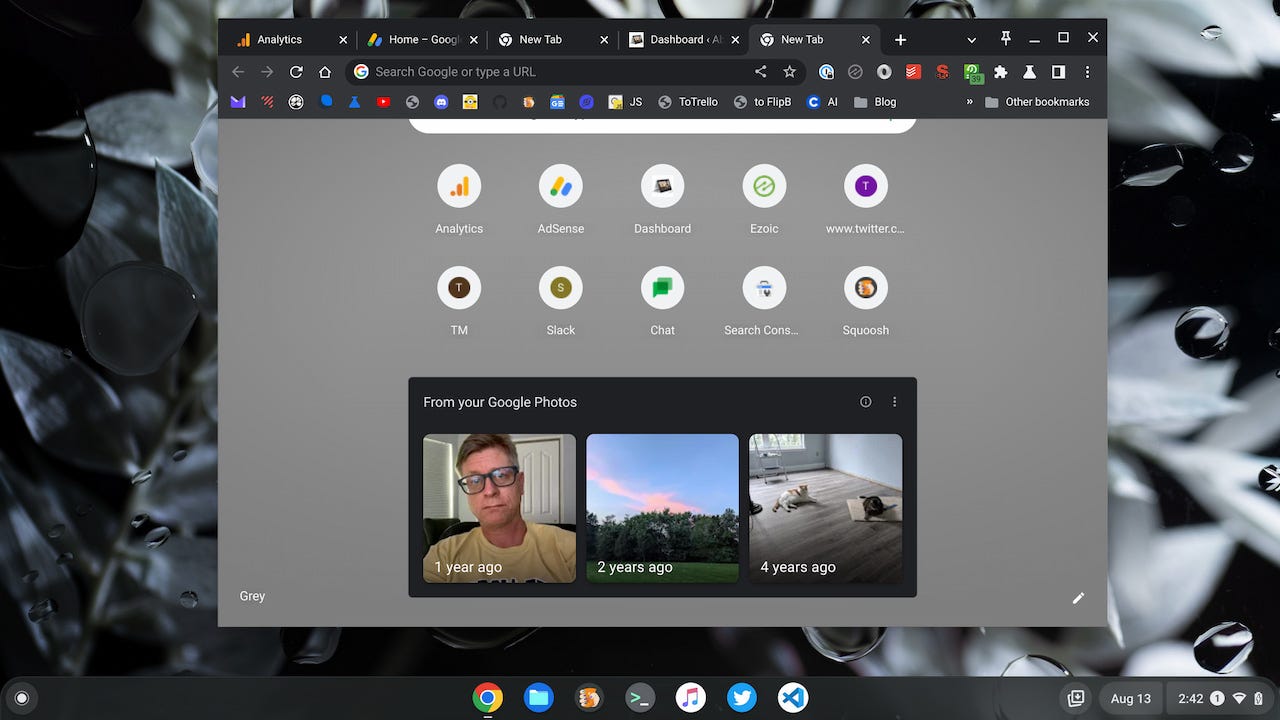
The latest ChromeOS 106 Dev Channel update updates a nice feature to the NTP or new tab pages. When I opened a blank new tab using ChromeOS 106, I saw an option to enable photo memories. This integrates Google Photos Memories on Chromebooks, so you can see images from this day or week from previous years. It’s a feature that has been in the works for a while but is hidden behind an experimental flag.
Previously, you could enable chrome://flags#ntp-photo-module to see this feature. With ChromeOS 106, that flag is set to “Default” on my Chromebook.
That suggests this will be available for all supported devices once ChromeOS 106 lands on the Stable Channel. And it will be available in the Chrome browser for Linux, macOS, and Windows too.
I noticed this option at the bottom of a new tab page, which provides a brief description of what it is. To actually see my memories from this day over the past several years, I had to click on the See Memories button.

Above, you can also see options to disable this feature and to customize other cards. Currently, there are recipe and cart cards.
After clicking the See memories button, I saw photos taken one year, two years, and four years ago on this day.

The photos will change each day, of course. When I open a new tab page tomorrow, I expect to see three different images from my Google Photos Memories. But this isn’t just a static slideshow of images. ChromeOS 106 integrates Google Photos Memories on Chromebooks too.
Clicking any one of the three images opens up a Google Photos Memories slideshow in a new browser tab. Here you can scrub forward or back in time through your photo memories.
Six years ago, for example, I was at the Google NYC office, where I took the below picture on August 9th. I believe this is from the terrace of the 11th-floor cafeteria.

At first, I wasn’t sure why Google is adding this integrated Google Photos Memories experience on the new tab page. That’s mainly because you can view your images from the Photos website. Then I realized, I really don’t do that too often. And I enjoy viewing those captured memories.
By including this optional feature on the new tab page, I’m more likely to see those memories on a daily basis. So it makes sense from that perspective. If you want to see your memories, you’ll likely appreciate this. If not, you can just disable the Memories card.
Chrome, ChromeOS 106 getting Partial Translate language feature
Google pushed the first ChromeOS 106 Dev Channel update this week and it just arrived on my personal Chromebook. After a quick first pass of looking for new features, one turned up. Both the Chrome browser and ChromeOS 106 are getting a Partial Translate language feature.
To use it, I had to enable an experimental flag, which I found at chrome://flags#desktop-partial-translate. The flag description does a good job of explaining the feature:
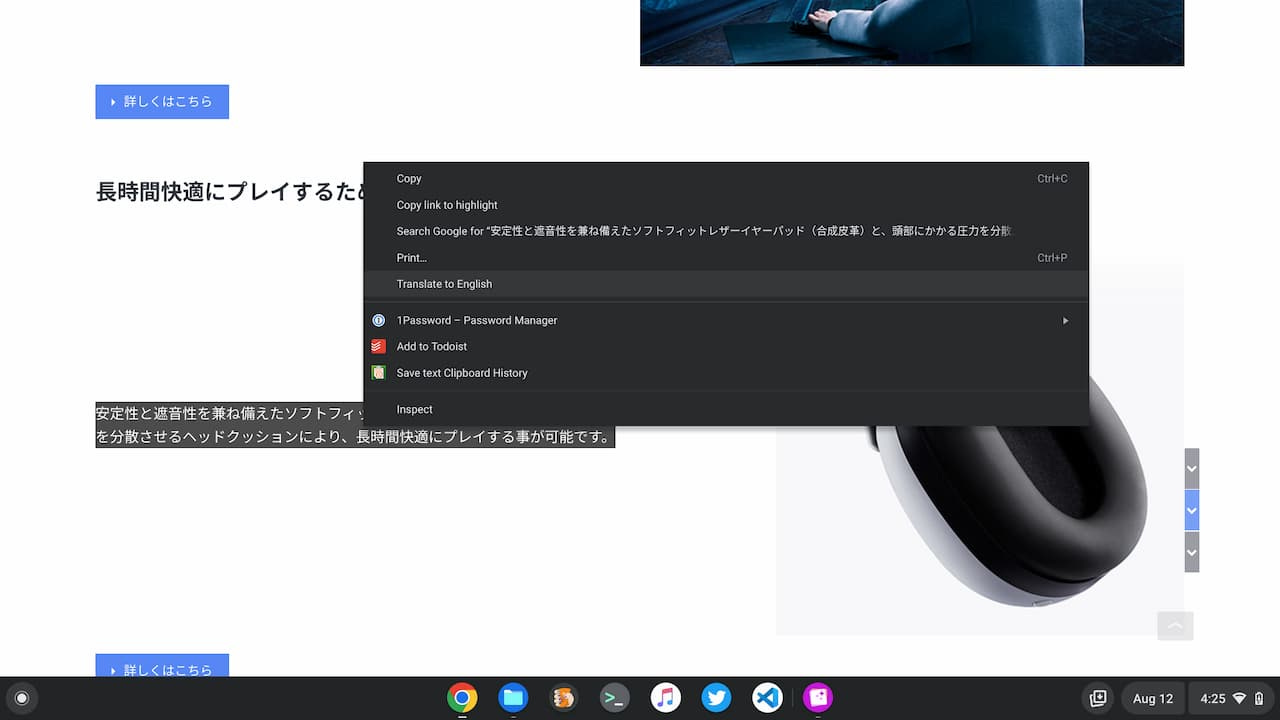
Enables the Partial Translate feature on Desktop, which allows users to translate text selections on the page through the right-click context menu.
Similar to Google Translate, this feature adds a “Translate to English” menu option after highlighting any website text. Note that the menu option uses English for my device, as that’s the primary language I use. I anticipate it will change based on the localization options of Chromebooks that use a different language.

Choosing the translate menu option opens a small popup showing the highlighted text. At the moment, the translation feature isn’t working on the few pages and languages I tested, however.

There are also options to modify the source and target languages in case Google misidentifies either. Additionally, you can choose to have the entire page translated.
Based on the flag details, this feature isn’t just coming to ChromeOS devices. It will be supported on the Chrome browser for Linux, MacOS, and Windows as well. Of course, that includes Lacros as well, which is the Linux browser that will be used on Chromebooks in the future.
I tend to translate whole pages, even when I need to understand just a snippet of text in a foreign language. Still, I can see the utility in the Chrome and ChromeOS 106 Partial Translate feature to focus on a small amount of information.
I’d anticipate this feature does make it into the ChromeOS 106 Stable Channel since much of the Google Translate code can be leveraged. If that’s the case, Chromebooks should see Partial Translate in roughly 6 to 8 weeks.
Wait, you can wirelessly transfer iPhone photos to the HP Elite Dragonfly Chromebook?
How did I completely miss the HP QuickDrop app in my HP Elite Dragonfly Chromebook review? This is an app that’s been around for a while. It lets you wirelessly share photos and files from either an Android handset or an iPhone to an HP Windows PC. And it’s pre-installed on HP’s flagship ChromeOS laptop so I can transfer iPhone photos to the HP Elite Dragonfly Chromebook.
I believe this is the first Chromebook to have HP QuickDrop support. And I hope that HP includes it with all of its Chromebooks in the future. I think of it as a less-featured version of Google’s Phone Hub but it’s still useful.
Phone Hub can certainly do more: Quickly enabling the phone’s hotspot feature, showing phone notifications, and full text messaging support. That’s in addition to the wireless file and photo sharing HP QuickDrop adds.
But I don’t use Phone Hub on my Chromebooks. Why? It only supports Android phones and I use an iPhone. Now, with HP QuickDrop and the HP Elite Dragonfly Chromebook, I at least get a little bit of data connectivity between phone and laptop.
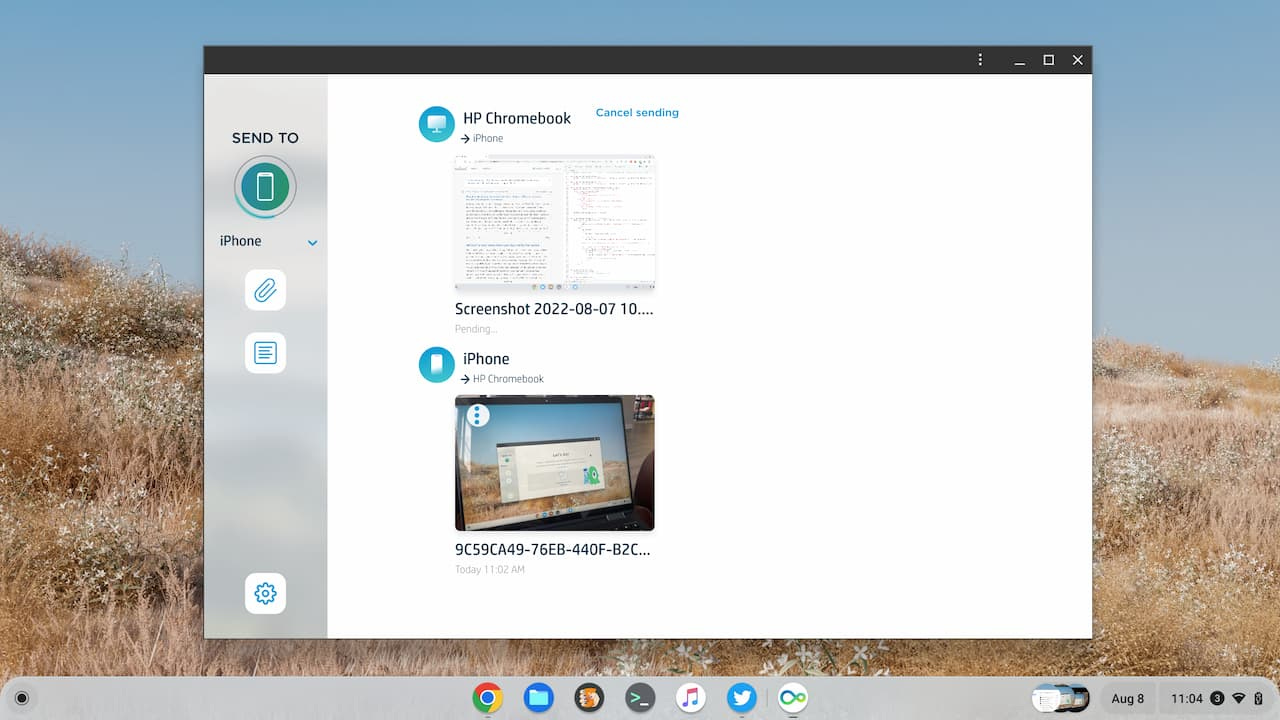
The HP QuickDrop setup process is simple: Just open the pre-installed app, which is a Progressive Web App, and follow the instructions. First, you scan the onscreen QR code to get the HP QuickDrop mobile app. I did this on my iPhone but there’s an Android version as well.

Once the app is installed on your mobile phone, you pair your phone, and review permissions for data access: Files, photos, camera, etc… And that’s it.
You’re taken to a screen with three action buttons at the bottom to send a file, take a picture and send it, or create and send a text note. Below is the start screen and a screen capture of a photo transfer from my iPhone to the HP Elite Dragonfly Chromebook.

I tested all of the functions in HP QuickDrop and they worked flawlessly. Even the camera integration worked. I took the below picture with my iPhone in the HP QuickDrop app and then used the app to shoot it over to the Chromebook.
How meta!

I like that the app shows a feed of your transfer activity between the phone and the Chromebook. Not only can you see a chronological list of activities, but you can see which device initiated the process.
Here you can see the camera image I took with the iPhone, which I sent to the Chromebook. After that, I sent an image from the Chromebook over to the iPhone.

Again, if you have an Android phone, the native Phone Hub is a much better option. HP QuickDrop provides a wireless phone transfer option to those of us who use Chromebooks with an iPhone. Or at least with this particular Chromebook, that is.
That’s all for this week!
It’s been a busy week and I don’t just mean from writing up news and such. I quietly migrated the site to a new, higher-powered server, which took me hours and hours over the course of two days. Somehow, the transition was seamless (yay!) and there was no downtime for the site. That effort is done, thankfully, so today is a day of rest for me.
I hope you take time to recharge with yourself and your loved ones too.
Until next time,
Keep on Chromebookin’!