


This week's news from About Chromebooks: March 20, 2022
Hello, fellow Chromies!
Recouping from my travel to Arizona took a bit longer than anticipated, hence no newsletter last week. I think I made up for it this week though.
Below you’ll find my first impressions of the HP Chromebase 21.5 as well as a how-to article that I hope is useful. There’s also good news for anyone planning to play PC games on their Chromebook but I won’t spoil the surprise here. ;)
Google will be making it easier to find Android apps for Chrome OS, and I explain the upcoming changes. And I got an early look at the new Chrome OS boot screen. Or should I say “chromeOS”, since there’s a branding change in the works. No matter what you call it, the new boot up process is far easier on your eyes and that’s the bigger news to me.
Cheers,
kct
This week’s most-read post on About Chromebooks
HP Chromebase AIO 21.5 unboxing and first look
The HP Chromebase AIO 21.5 was announced in August of 2021, which is kind of bad timing. With its 10th-generation Intel processors, it now has to compete with current 11th-gen and coming soon 12th gen CPUs in Chrome OS devices. However, this is the most recent Chromebase, so there isn’t much competition yet. I just received the highest-end configuration, so here’s my HP Chromebase AIO 21.5 unboxing and first impressions.
This review model is currently priced at $739.99 on HP’s site and has the maximum possible current configuration.
This HP Chromebase is mostly all high-end
That includes the 21.5-inch, 1920 x 1080 IPS touch panel with 250 nits of brightness, along with a full Chrome OS computer inside. Powering that computer is the dual-core Intel Core i3-10110U processorand Intel’s integrated UHD graphics.
It seems a little strange to use a relatively low-powered, 15W CPU – this chipset was used in many Chromebooks – since the HP Chromebase is always connected to an outlet.
Also inside is 16 GB of memory and 256 GB of NVMe storage. Intel’s radio chip supports WiFi 6 and Bluetooth 5. You’ll need that Bluetooth if you want to use the included wireless keyboard and mouse. Batteries are included for both.

Atop the touch screen is a 5-megapixel webcam and a physical switch to disable the camera and the microphone. You can slide over the shutter to disable the camera but keep the microphone active, which is handy. Or you can slide the switch further to disable both.

Built into the attractive stand are the power and volume buttons as well as the external ports.
You’re getting a pair of USB Type-A ports and the same number of USB Type-C jacks. There’s also a microphone/headphone combo port. The 90W proprietary charger connects underneath the base and you can route the cord out of a nicely designed channel.

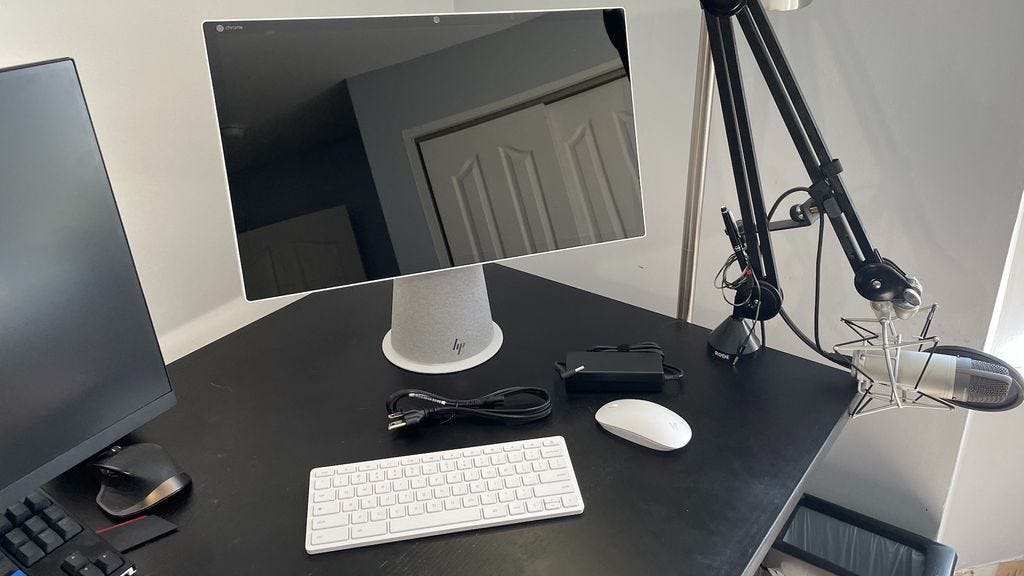
In terms of setup, it was simple. I connected the power cord to the HP Chromebase and put batteries into the mouse and keyboard.
Upon booting up, I was greeted with the below setup screen to pair the accessories, which took all of 30 seconds. Then the rest of the traditional Chrome OS setup process followed.

Frankly, this couldn’t be easier to set up. Due to a Chrome OS update that I downloaded and installed, I was up and running quickly. Without the update, I estimate you can go from unboxing to work in around three minutes.
First impressions are favorable
Obviously, since I just received the HP Chromebase, I can’t offer a full review right now. I’ll use the device full-time for around a week or so before doing that.
However, I do have some first impressions worth sharing.
The overall design is well executed, save for the headphone jack on the very back of the base. I wouldn’t mind seeing that right up front, but that’s just me. The look and feel reminds me of Apple’s design language, if you like that sort of thing.
As noted, the setup process is simple and fast, which I appreciate.
Even at a maximum of 250 nits brightness, the display is fine in my home office. I have a bay window with plenty of sunlight, for example. Even at 75% brightness, this display is vibrant and nice to look at.
I’m used to a mechanical keyboard and high-end mouse on my desk. The included accessories here are not those. But just in writing this post on the HP Chromebase, they seem adequate, if not good.
The integrated B&O speakers in the HP Chromebase are far better than you’ll find in most Chromebooks. There’s more bass and the volume levels can go very high. At 25% volume I have good sounding background music while working. Boosting that to 50% easily fills the room with sound.
I haven’t run any performance tests but while writing this post, the HP Chromebox kept up with my pace. That included streaming music, six browser tabs for research and a PWA I use to edit and compress photos. That’s not a huge workload and I’d expect this hardware to keep up. I’ll be pushing the envelope by adding more tasks such as coding in the Linux environment.
As shown below next to my Windows gaming PC setup, the HP Chromebase display rotates to portrait mode. I don’t think this is a big seller for many people but it is for me. I like to write code in this orientation because I can see more of my code at once. However, I’ll be testing the use of an additional external display in landscape mode to supplement this.

Overall, my first impressions are quite positive. And if you’re in the market for an all-in-one Chrome OS computer, the HP Chromebase is the most recent option.
I still think it was bad timing for the product launch given the chip cycle. However, that may not matter to most of the target audience. Normally, I’m not in that audience but the portrait mode option places me squarely in it. So I’m looking forward to my typical workflow using the HP Chromebase AIO 21.5.
Behold the Chrome OS 101 dark Chromebook boot screen that no longer blinds you!
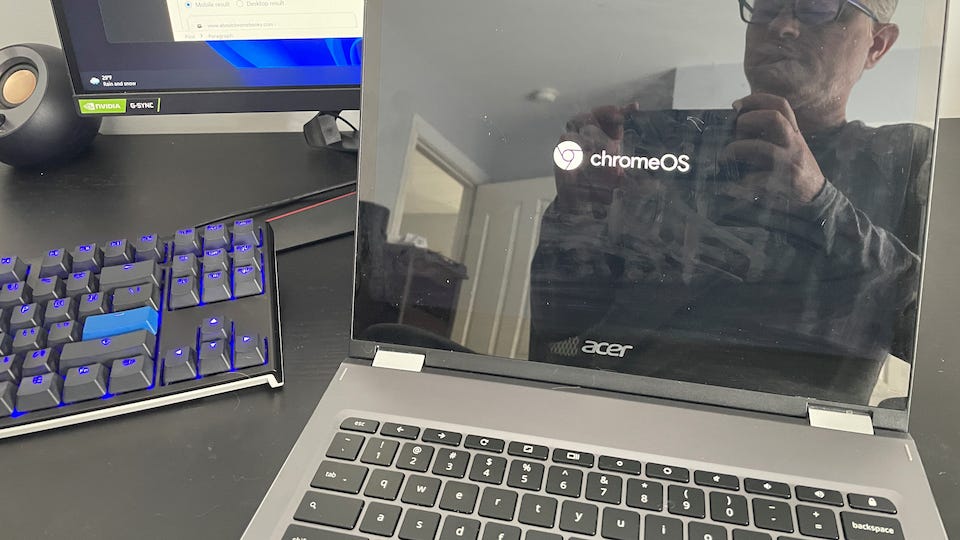
After nearly a week of being mostly offline for travel and other reasons, I just updated my Acer Chromebook Spin 13. I run the Dev Channel on it and see that it got bumped up to Chrome OS 101 for the first time. Lo and behold, the blazingly bright boot screen is gone! Thanks to Chrome OS 101, I now have the dark Chromebook boot screen that’s nearly a decade overdue.
Apparently, I’m also overdue to clean my Chromebook’s display. But I can assure you, I do that more than once every 10 years.
To be honest, this isn’t a massive or ground-breaking technological feature. I know that. But it gives hope to all of those burned retinas that Chromebook users have had to deal with like… forever.
Seriously, Chromebooks first hit the market in 2010 and we’re just now getting this feature? It couldn’t have been that difficult to implement. Sigh.

Aside from the high-intensity white that sears my peepers every time I boot up a Chromebook, it’s also a pain when I work late at night. In a dark room. In bed. Next to my sleeping wife. Booting my Chromebook wakes her up every single time.
And that brilliant white boot screen burns my eyeballs even more in what was a completely dark room. Seriously, I think the Chrome OS logo is burned into the back of my eyes. I’ll take this dark Chromebook boot screen any day over the current one.
By the way, I didn’t have to set any flags or make any changes in Chrome OS to get this dark Chromebook boot screen. That makes sense since Chrome OS itself isn’t even fully running until after the boot-up process. So once you get Chrome OS 101, you’ll simply have the feature.
Anyway, I’ll be looking around to see what’s what in Chrome OS 101, given that it should be on your Chromebook in roughly eight weeks. But first, I need to finish unpacking from my travels and catch up on more important news. I see that the Chrome OS 99 Stable Channel arrived while I was away and I’m always keen on seeing what features did or didn’t make the cut.
How finding optimized Android apps on Chromebooks will get easier

Struggling to find optimized Android apps on Chromebooks? Android 12L, announced a few months back, will help. But it’s not enough to just add better support for mobile apps on larger screens. You still have to find them. Google announced changes that will make it easier to find those optimized apps.
The company says this will be accomplished in three ways. And all of them will tweak Google Play.
First is a change to how Google will rank Android apps for Chromebooks and tablets.
Essentially, if the software meets Google’s optimization standards for large screens, it will appear higher on the Play homepage and during app searches:
In the coming months, we’ll be updating our featuring and ranking logic in Play on large screen devices to prioritize high-quality apps and games based on these app quality guidelines. This will affect how apps are surfaced in search results and recommendations on the homepage, with the goal of helping users find the apps that are best optimized for their device.
While that’s a good start and should make Chromebook users happy, the second approach may have more impact. And it could help nudge more Android developers to improve their apps on larger screens.
When you install a non-optimized Android app on a Chromebook, for example, the Play Store will communicate a potentially poor experience.
And it effectively calls out the developer, letting you know they haven’t put in the time and effort to optimize their software for Chromebooks and tablets. I wouldn’t want that message associated with me if I were an Android developer.
Lastly, Google will give developers a new tool to review their app ratings by device, including Chromebooks.
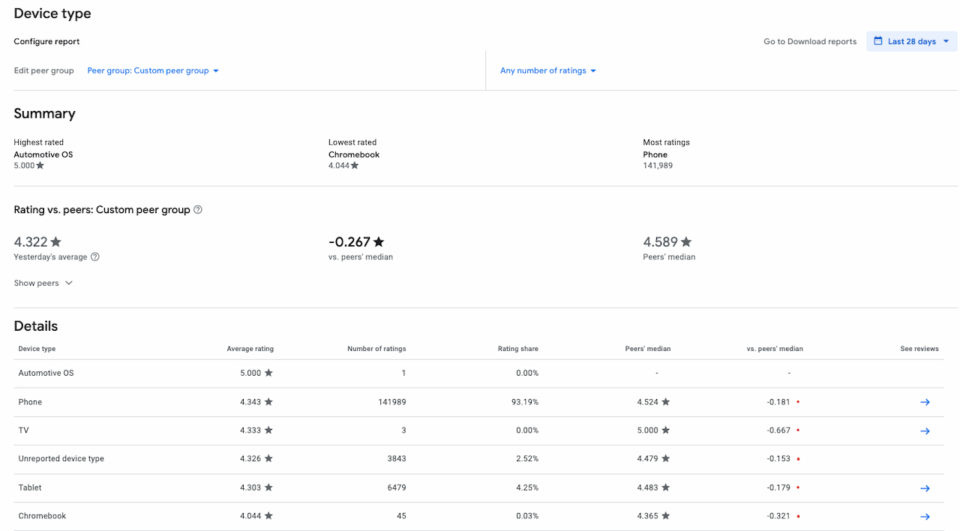
This data isn’t exclusive to developers though.
When you view Android apps on Chromebooks in the Play Store, you’ll see Chromebook-specific ratings. That too could incentivize developers to optimize their Android apps for Chromebooks and tablets using the tools in Android 12L.
I still have one interesting open question about this though. When will Android 12L support actually arrive on Chromebooks?
Most devices are still running Android 9, although a few have been upgraded to support Android 11. Without a timeline of pushing out Android 12L on a large scale to Chrome OS devices, there’s no timeline for when we’ll see optimized Android apps on Chromebooks.
Chrome OS 101 adds support for variable refresh rates on Chromebook displays

Guess who just got another Chrome OS 101 Dev Channel update on his daily driver? Yup, it’s me. And I immediately noticed a new experimental setting that adds another piece of the puzzle to native gaming on Chromebooks. Chrome OS 101 brings support for variable refresh rates on Chromebook displays.
What is a variable refresh rate?
Here’s a quick explainer for what variable refresh rates are and what they bring to the table. Let’s start with the “refresh rate” of a display is.
If your Chromebook has a 30 Hz display, that basically means it can render or show 30 different frames every second. Likewise, a 60 Hz display can show 60 frames per second. The higher the number, the smoother the overall display looks, particularly when watching videos or playing games.
The gaming PC I built, for example, is paired with a 144 Hz monitor, mainly because I have a high-end graphics card that can actually push, or “refresh”, that many frames per second. More actually, but I’m happy with the monitor I have.

Given that description, you might be able to guess what variable refresh rates are. This is when a computer’s display can match the refresh rate of a graphics chip or card. With the feature on a supported display, frame rates from the GPU are synchronized to the display to eliminate stutters and screen-tearing.
I’m sure everyone has seen stuttering at least once on a monitor or display. Screen-tearing is more common in the gaming world and it’s not pretty. It’s as if the game is rendered in multiple, offsetting parts of the display and happens when the screen can’t keep up with the GPU.
Here’s a visual example, courtesy of Wikipedia:
.jpg)

What does having variable refresh rates on Chromebooks mean?
In Chrome OS 101, there’s a new flag found at chrome://flags#enable-variable-refresh-rate.

Obviously, this is meant to deliver the feature to Chromebooks, but there’s a gotcha in the description. It will only work on “capable displays”. And to date, I don’t know of any Chromebook that has a display with variable refresh rate support.
So don’t expect to eventually get a better video experience on your existing device. It might be possible on some relatively newer devices connected to an external monitor that supports variable refresh rates, but I can’t be sure.
Essentially, this is all about native gaming on Chromebooks.
And it follows last month’s discovery of Chrome OS support for RGB keyboards, which are a gaming staple. It’s not likely that entry-level devices or even most mid-range devices will support this feature. We already know that you’ll need a hefty CPU and GPU to run Steam games on a Chromebook, for example.
So if you’re not going to run demanding PC games on a Chromebook, you probably won’t care too much about this Chrome OS 101 detail.
Well, you might if you want to watch videos with frame rates higher than 30, but it’s likely not a “must-have” for Chromebook budgets topping out around $600 or so. Although once you see a 60fps video, it can be difficult to go back to the standard 30.
Either way, with Chrome OS 101, Google is continuing its expansion of Chromebooks beyond “just a browser” by supporting technology for a good gaming experience.
By the way, the experimental flag makes note of Adaptive Sync.
It’s worth noting that the two big GPU names, AMD and Nvidia, both support variable refresh rates. AMD’s solution is called Freesync and uses royalty-free variable refresh technology also known as Adaptive Sync. Nvidia’s G-Sync is a proprietary solution offering the same experience. The experimental flag then may be suggesting AMD GPUs in future Chromebooks.
How to find your Chromebook board name (and why you want to)
While every Chromebook has a unique brand model name, each has an internal board name as well. Here’s how to find your Chromebook board name.
Why would you want to know it? Google has changed the webpage that provides information on which Chrome OS version is available for each Chromebook. The board name is a little more important than your Chromebook model.
Here’s what the old Chrome OS version page looked like. You can see that in addition to the board code names, Chromebook makes and models are also listed.

The old page has been deprecated and replaced with a new, more modern-looking interface:
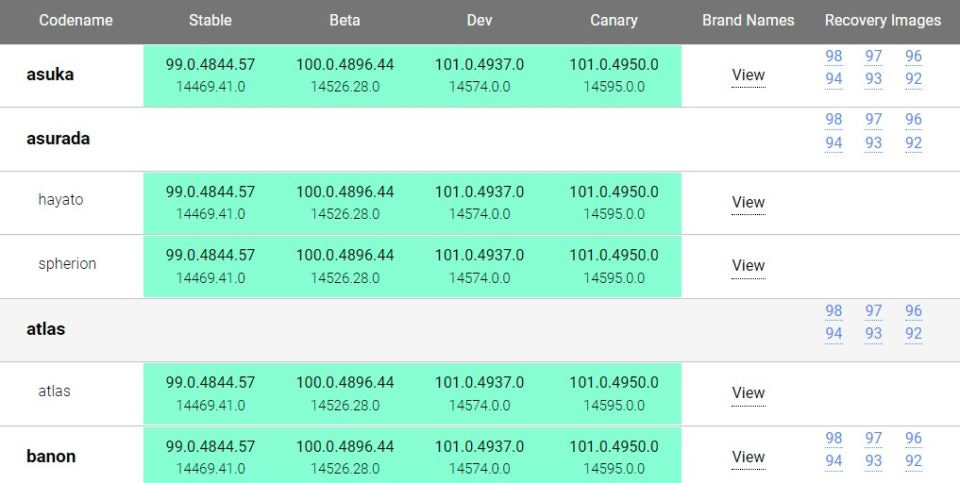
Here the board name, or codename, is still the primary method of organization.
While you can search for devices and view the Chromebook brand associated with its respective board name, it’s quicker if you already know your board name.
To find on your device, enter chrome://version in your browser. You’ll see information similar to this, which is from the HP Chromebase 21.5.
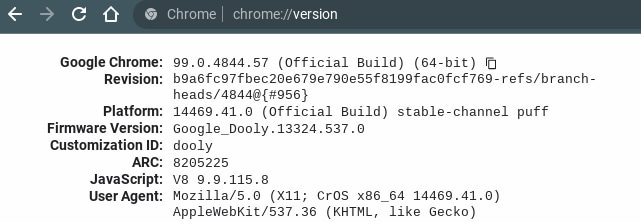
In this example, the board name is Puff as shown by the Platform information.
However, there are several devices that use Puff, which is typical: Many Chrome OS devices share the same board but then have different customizations for different hardware partners.
That brings us to the second piece of information for a specific device, which is on the Firmware Version line.
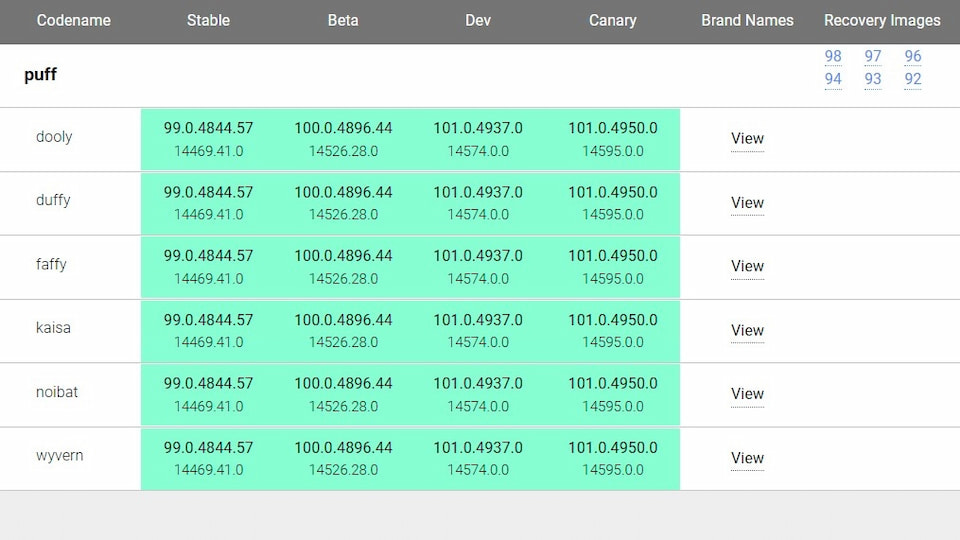
The HP Chromebase 21.5 is known as Dooly. So for me to track Chrome OS release information for this device, I want to look for Dooly under the Puff section on the Chromium Dash page.

Aside from tracking the Chrome OS releases for your Chromebook, this page is useful if you need to recover the firmware on your device.
In the image above, see the right-most column?
That’s where you can download recovery images for the last few Chrome OS releases. These are all device-specific, so you’ll need to know your Chromebook board name to get the appropriate software.
That’s all for this week!
This coming week I should have my review of the HP Chromebase 21.5 out the door. So far, I’m pretty impressed by this Chrome OS all-in-one, even if it’s not my typical choice of device.
Also, we’re getting close to the end of March, which means April is right around the corner. And that’s the month when we should see the HP Dragonfly Elite Chromebook become available. I’m still concerned about the price for this 12th-gen Intel device, but let’s see if HP surprises me!
How to find your Chromebook board name (and why you want to)
The directions did not work for me.
I found the board name under Platform Information
"But I did not find the specific device using the Firmware Version line, I found my model by referencing the Customization ID line.