
This week’s news from About Chromebooks, Nov. 27, 2022
Hey Chromies!
I didn’t really commit to a newsletter this week due to the Thanksgiving Holiday weekend here in the U.S. I also didn’t write too much this week. Still, those two posts might be of interest to some. So rather than skip this week’s newsletter, I’m quickly whipping this up for everyone. And then it’s back to enjoying what’s left of this long weekend! (That means watching some World Cup matches, coding practice and quiet time with my wife — my son and I ditched her yesterday for a 45 mile motorcycle ride since it was mild and sunny outside.)
This week I shared an interesting new online tool for developers. Yeah, I know most of you aren’t developers. Feel free to skip that one, which I’ll put lower in the newsletter! (Or get interesting in development — it’s never too late to learn!)
I also got a Framework Chromebook sent to me on loan. This is a fascinating Chromebook to me, not just because it’s a high-end Chrome OS laptop. You can swap out the four modular ports to configure the Framework Chromebook however you want. I popped in a pair of USB Type-C ports, for example, as well as a microSD card and HDMI output for an external monitor.
It gets better though! Any internal parts you want to repair or upgrade are easily accessible. Love it!
Also, my regular, weekly goes out to subscribers that bought me a coffee. If you get value from this newsletter and want to say thanks, click the button below. As always, that’s never required but always appreciated.
The Framework Chromebook teardown process is super easy
First announced in September, the Framework Chromebook is the first truly modular, upgradeable Chrome OS laptop. I received a demo unit last week for a full, upcoming review. Since this is such a different piece of hardware, I didn’t want to start by actually using it. So let the Framework Chromebook teardown begin!
Anyone familiar with Framework products already knows what to expect. The company started selling its Framework laptop with Windows, or without an operating system so you can install Linux, last year. I’ve already seen several videos showing how easy it is to upgrade or repair.
You wouldn’t know this is a modular Chromebook
I dismantled the Framework Chromebook for personal experience, and for any Chromebook users that haven’t seen the innards of a Framework device.

Before tearing down the Framework Chromebook, I was surprised. You really can’t tell that it’s simple to get at the Framework Chromebook internals. I think that’s a good thing. Even before checking the performance, which should be exceptional, it feels like a $999 laptop.
The chassis and overall build are super solid. It hides the “secret power” of repairability. Obviously, you can see some modularity from the outside. There are four expansion ports, two on each side of the chassis. This is where you can swap in different modules so the port configuration is customized to your liking.

The review package included six modules: three USB Type-C ports, one USB Type-A, one microSD reader, and one full-sized HDMI. I plan to have two USB-C ports, one on each side, along with the card reader and HDMI output. I generally don’t need a card reader but I’m going to swap out the SSD for some testing purposes. I’ll need the ChromeOS recovery image for that and I’ll use a microSD card to store it.
The Framework Chromebook teardown process
The Framework Chromebook teardown process is simple and all it takes is a single tool. That tool is included by the way. It has two different driver heads and a flat edge at the end to use as a pry tool.

The five screws shown above are what keep the keyboard connected to the rest of the chassis. They’re all the same size and best of all, they stay in the chassis when unscrewed. Very nice!

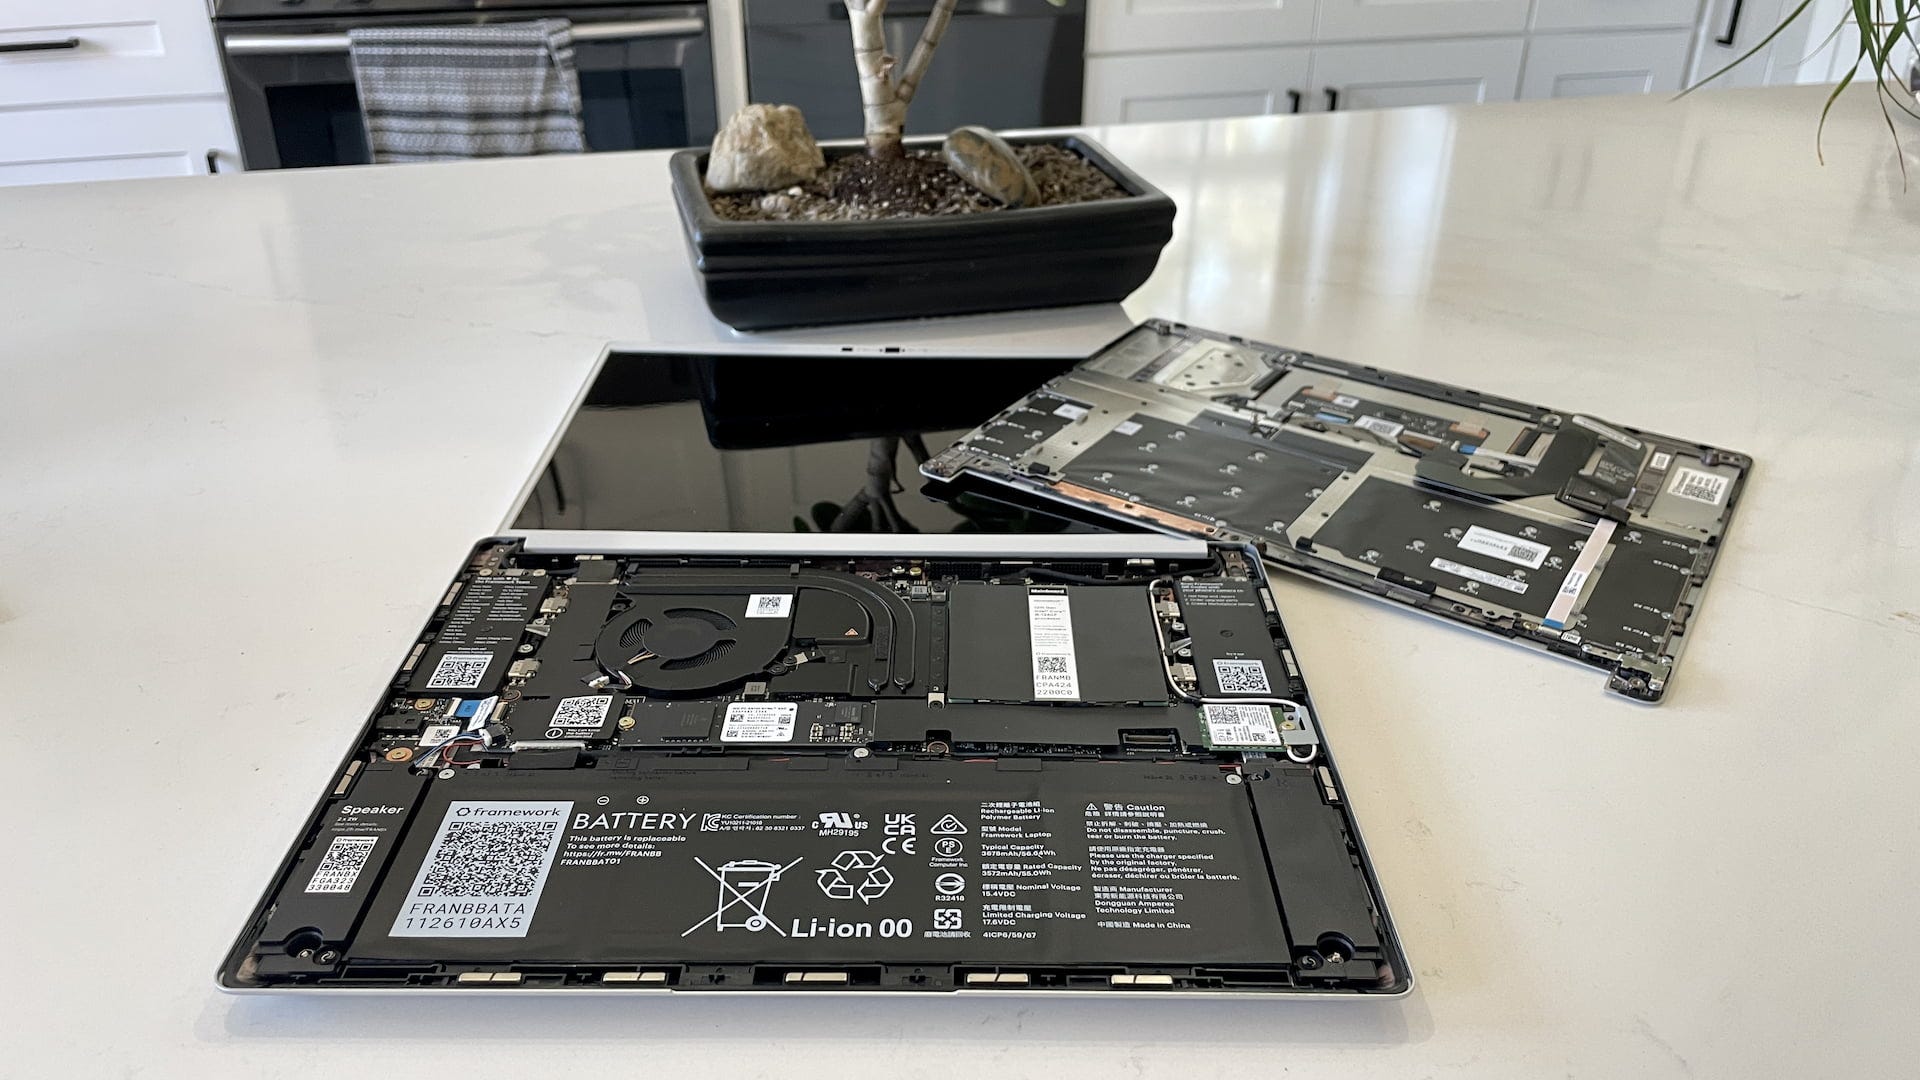
After all five screws are loosened, you just pry the chassis base from the keyboard deck. There is a ribbon cable connecting these two parts, which is easy to remove and later replace. Once the keyboard is lifted off, the internals of the Framework Chromebook are exposed and accessible.

The inside is user-friendly
Just like the Windows version of the Framework laptop, everything is well labeled. I first removed the battery, for example, and there are three screws holding it in place. They’re labeled “1 of 3”, “2 of 3”, and “3 of 3”. So you know what screws to remove to take out just about any part.
With the battery out, I removed the speakers, which sit on pegs. There’s no screw for these. Framework sells a speaker replacement kit for $19 if you ever need it. In fact, every part imaginable to replace or upgrade the Framework Chromebook is readily available. That’s the whole point of this laptop.
I also removed the Wi-Fi module, 256 GB SSD, and heatsink to get a feel for the repair and replace process. I stopped at the motherboard and trackpad, mainly because I still have to review the device. I’d hate to break something major that would prevent me from doing so.

While I was inside, however, I did add a second memory stick.
The review laptop came with a pre-installed 8 GB memory module and Framework sent me another one. Bumping up the device to 16 GB of memory was a snap. Literally.
I inserted the second stick of RAM at an angle in the open memory slot and then snapped it flat into place.

After the Framework Chromebook teardown
I’ve already buttoned up the Framework Chromebook, which took me all of 10 minutes. That includes replacing all of the parts I removed and upgrading the memory. The device booted right up into ChromeOS and it now shows 16 GB of memory.
I will be doing another Framework Chromebook teardown though. I definitely want to swap out the SSD and restore ChromeOS on it to experience that process. But first, I’ll be using this laptop to get a feel for the performance of the 12th-gen Intel Core i5-1240P and Iris Xe graphics.
It has to be at least as fast as Chromebooks with similar hardware such as my Acer Chromebook 714. This processor isn’t really meant for ultraportable laptops though. It can use more power, which in turn can lead to less battery life. I’m interested to see just how much battery life that chipset eats up in comparison to most other new Chromebooks.
GitHub Codespaces on a Chromebook is fantastic!
As someone studying JavaScript, I have to say: GitHub Codespaces on a Chromebook is fantastic. I use my Chromebooks for nearly all of my coding studies, leveraging the native Linux support. This approach got me through 8 JavaScript classes at my local community college. I wish I had GitHub Codespaces back then though!
What is GitHub Codespaces?
Since Microsoft purchased GitHub, it has steadily been improving its features. GitHub Codespaces is the latest upgrade and it provides remote coding sessions with VS Code in the browser.
Normally, I wouldn’t use an online code editor for my programming studies. I’ve tried many in the past and they’re all fine. However, I like to use the full VS Code desktop. I tend to purchase high-end Chromebooks mainly to ensure good performance of the VS Code app in Linux.
GitHub Codespaces opens up the use of VS Code, and GitHub, on even an entry-level Chromebook. Similar to how GeForce now streams games to your laptop, Codespaces creates a coding environment for your browser. All of the “heavy lifting” is done in a virtual machine on a remote server.
GitHub Codespaces on a Chromebook
I won’t go through the whole setup process of using GitHub Codespaces here. That’s better left to the folks at GitHub.
What I will share is how I’m using it on my Chromebook and what the benefits are. Note that GitHub provides a set number of hours to use Codespaces for free. So anyone can try it at no cost. Pricing varies by how many hours used over the free tier and is determined by “core hours”. That means if you use a 4-core virtual machine, the time usage ticks up by twice as much over a 2-core VM.
Right off the bat, there are a number of environmental templates available for a Codespace. These are all Docker containers and are pre-configured with the software tools you might want or need for your project.

Of course, these are just to get you started by saving configuration time. You can always add whatever packages or dependencies you need, right through the VS Code terminal in your browser. This all saves a bunch of time setting up the coding environment.
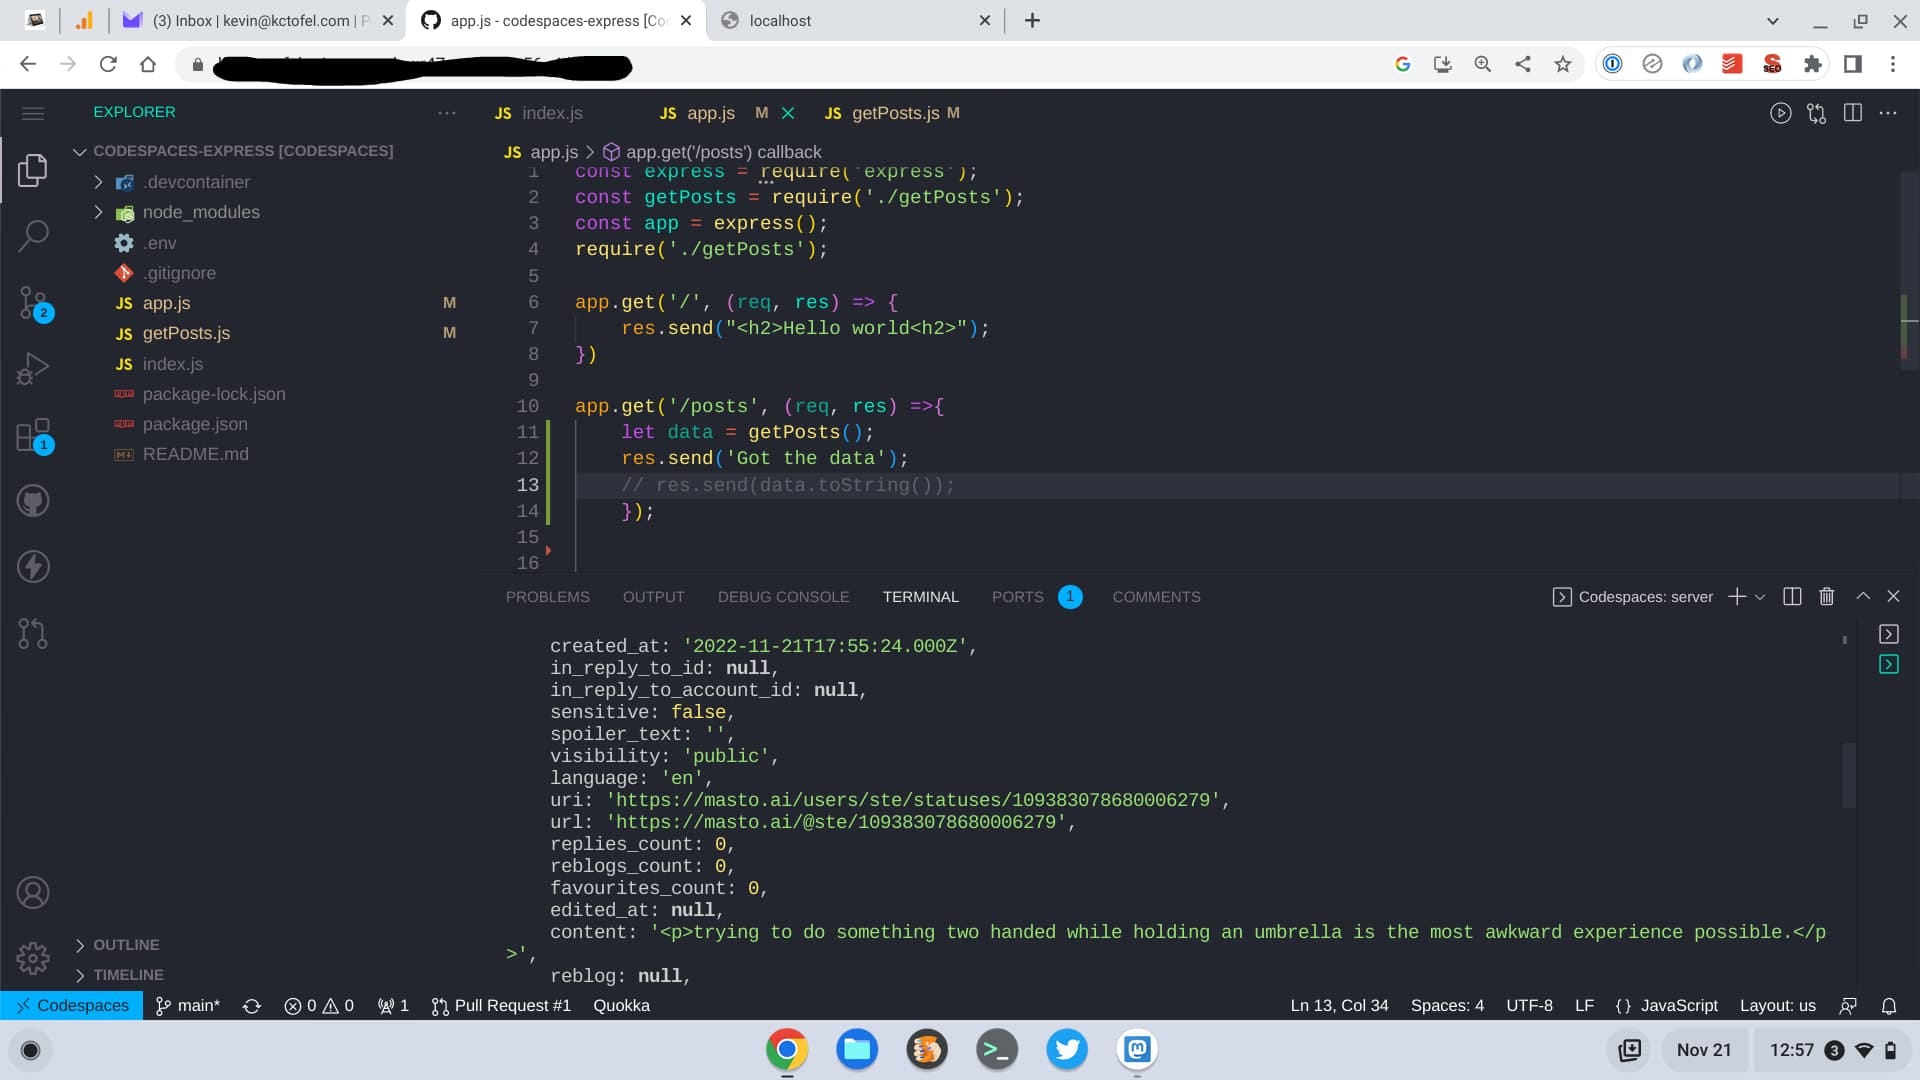
Once the container spins up, you’re all set to start coding on your Chromebook. And you get all of the bells and whistles found in the VS Code desktop app.
Benefits of GitHub Codespaces on a Chromebook
As I mentioned, you don’t need an expensive 12th gen Intel Chromebook to use GitHub Codespaces. Thanks to the virtual machine you’re connected to, any ChromeOS device should be fine.
Aside from that benefit is the integration between your code and your code repository. All of your changes are saved to your GitHub account and the repository looks like any other. That means if you have VS Code installed on another desktop, laptop, or Chromebook, you have access to locally work on the same code.

You can’t, for instance, see that I created the above repository and its code through GitHub Codespaces. It looks like a normal repository of code and it’s available to any device. I can pull the code down to keep moving along in the VS Code desktop app. Or I can spin up my Codespace from the browser and keep working. It’s all completely seamless.
Speaking of seamless, all of my VS Code desktop configuration settings sync up with this cloud client. Even my VS Code extensions are there.
Best of all is that I don’t need to include environmental variables in my code. Developers typically store private keys for APIs as environmental variables. This lets their app speak to other apps, get data, and write data, for example. That’s what I was testing over the weekend: An app to get posts from Mastodon. I don’t want anyone to see my Mastodon access tokens though.

Instead of putting them in VS Code, there’s a place in GitHub Codespaces itself to store them. So there’s no chance someone else will ever see and use them.
Is there a downside?
Of course, no solution is perfect. Your Chromebook must be connected to the internet to use GitHub Codespaces. So I wouldn’t rely on this as a primary solution unless you work at home or somewhere where there’s always connectivity. I’m not going to abandon my recent Chromebook purchase as a result; I want the option to use VS Code offline on my Chromebook.
Still, this GitHub Codespaces is another tool in the Chromebook arsenal if you do any coding and like VS Code. For now, I’m going to keep using it, mainly for the quick setup and other features that it provides.
That’s all for this week!
I hope all of you in the U.S. got to spend some quality time with family and friends. I did and I also used the time to recharge my batteries.
That’s good as we enter another holiday season in a few short weeks. And then, right after New Year’s Day, I fly out to Las Vegas to cover the Consumer Electronics show. Here’s to enjoying the calm before storm! ✌️
Until next time,
Keep on Chromebookin’!